
Major GTX1 Surgery...
- Thread starter Kip Ewing
- Start date
You are using an out of date browser. It may not display this or other websites correctly.
You should upgrade or use an alternative browser.
You should upgrade or use an alternative browser.
Thanks!
I really appreciate all the compliments from everyone.
Half the reason I do this stuff is for the creative fulfillment.
It's nice to know people dig it.
Wow is all I can say ! The design looks sweet .Your talent is so very impressive!!!
Thank you for sharing!
I really appreciate all the compliments from everyone.
Half the reason I do this stuff is for the creative fulfillment.
It's nice to know people dig it.
I really appreciate all the compliments from everyone.
Half the reason I do this stuff is for the creative fulfillment.
It's nice to know people dig it.
Kip what's the other Half?
Seriously wonderful work you've done on the GTX1, and the other projects too.
It is a real education to all of us here on the Forum, when you get into the bolts and nuts of what and how you have approached and solved the Problem of the Day. Or night in your case.
The technical reasons for doing such and such, certainly provides we GT owners with a better understanding, and appreciation, of what went into our cars by the Design Team.
Keep it up!:cheers
Steve Helmstock stitched this interior. Perhaps he could post some.
Cheers
Kip
Kip,
Would you please post the photo's after the interior is back in. Steve does not have access to the forum.
On another note, I really like the new design changes in the top.:thumbsup
The other half.
The other half?
G and Ts from happy customers at the Rallies....
Thanks for the compliments, Jeff!
Cheers
Kip what's the other Half?
Seriously wonderful work you've done on the GTX1, and the other projects too.
It is a real education to all of us here on the Forum, when you get into the bolts and nuts of what and how you have approached and solved the Problem of the Day. Or night in your case.
The technical reasons for doing such and such, certainly provides we GT owners with a better understanding, and appreciation, of what went into our cars by the Design Team.
Keep it up!:cheers
The other half?
G and Ts from happy customers at the Rallies....
Thanks for the compliments, Jeff!
Cheers
Steve's interior work
I will definately post photos of the interior.
Steve does great work.
This interior is really, really cool.
Kip,
Would you please post the photo's after the interior is back in. Steve does not have access to the forum.
On another note, I really like the new design changes in the top.:thumbsup
I will definately post photos of the interior.
Steve does great work.
This interior is really, really cool.
More progress
Greetings all
OK, more progress.
This past week we completed the surfacing of the roof pattern.
Time to make the production tool!
The first step in this process is to form what we call 'run-off'.
This is essentially an extension of the part surface. This helps to give the mold structure. It also helps with providing land to affix the vaccum bag when we infuse the part with resin.
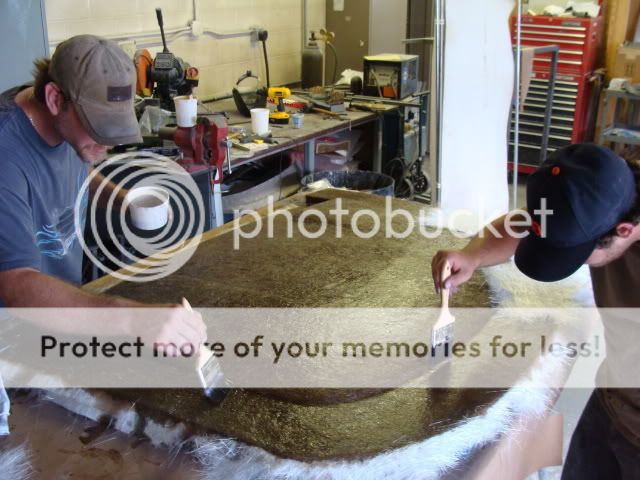
After the run-off is formed, we apply wax to the pattern as a release agent. After that, another release is sprayed, before we apply a gel coat surface to the pattern. This gives us a very smooth and durable face to the tool.
After this gel has cured a bit, we start to build up numerous layers of heavy fiberglass to create the tool.
Beyond this, we build up an extensive backing structure to the tool.
This ensures it won't warp in the future. Changes in temperature can cause tools to change form.
Loads more progress in the past week that we will post in the coming days.
We already molded the first exterior skin, remastered the inner structure off of this production skin, and created the production tool for the inner structure.
Tomorrow we produce the first inner panel.
Massive progress to come.
Got to get this thing ready for the Rally!
Once again, I will be forced to use a GT Rally to catch up on my sleep....
Unless, of course, Dale Watson is playing at the Continental....
October will be a busy month. We are moving to a new shop that is nearly 3 times as large as the current one! Anyone need to store a GT this winter?
Greetings all
OK, more progress.
This past week we completed the surfacing of the roof pattern.
Time to make the production tool!
The first step in this process is to form what we call 'run-off'.
This is essentially an extension of the part surface. This helps to give the mold structure. It also helps with providing land to affix the vaccum bag when we infuse the part with resin.
After the run-off is formed, we apply wax to the pattern as a release agent. After that, another release is sprayed, before we apply a gel coat surface to the pattern. This gives us a very smooth and durable face to the tool.
After this gel has cured a bit, we start to build up numerous layers of heavy fiberglass to create the tool.
Beyond this, we build up an extensive backing structure to the tool.
This ensures it won't warp in the future. Changes in temperature can cause tools to change form.
Loads more progress in the past week that we will post in the coming days.
We already molded the first exterior skin, remastered the inner structure off of this production skin, and created the production tool for the inner structure.
Tomorrow we produce the first inner panel.
Massive progress to come.
Got to get this thing ready for the Rally!
Once again, I will be forced to use a GT Rally to catch up on my sleep....
Unless, of course, Dale Watson is playing at the Continental....
October will be a busy month. We are moving to a new shop that is nearly 3 times as large as the current one! Anyone need to store a GT this winter?
Thanks for sharing this build process. It provides a real appreciation for the efforts required to create a great finished product. :cheers
Door cap progress
Big progress on the door caps this past week.
You will recall this thread started with the clay modeling of the door caps.
We made rough molds and cast hard urethane models of these clay models.
One of the most difficult things to do in manual prototyping is to make the opposite handed part, or make the right side look just like the left side you modeled.
Fortunately, prototyping is evolving the same way as desktop publishing and photography. Computers have revolutionized everything.
We used a laser scanner to capture the 3d form of these master door caps as a digital model. Here is a screen shot of how the data is captured.
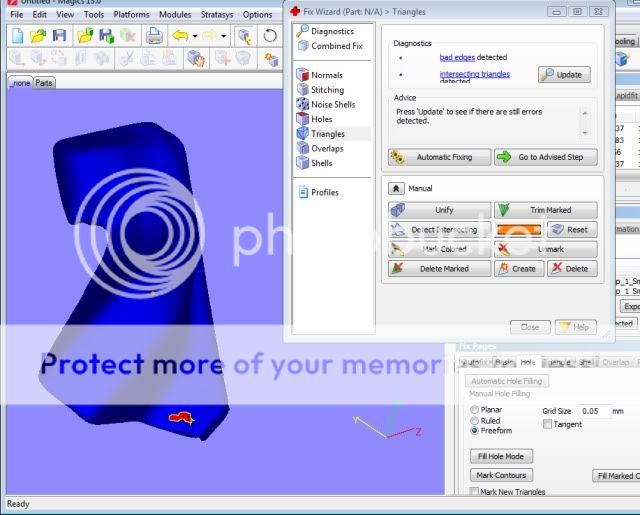
This computer data can be reflected to create a mirror image of the left side I modeled manually.
This is where it gets really cool...
We used what is called an FDM machine (fused deposition modeler) to create the right hand parts in ABS plastic directly from the scan data. Essentially, an FDM machine is a 3d ink jet printer that makes things out of plastic.
It takes the machine about 5 hours to make a door cap, and it is an exact reflection of the left side part. The time this saves and the accuracy it affords is amazing.
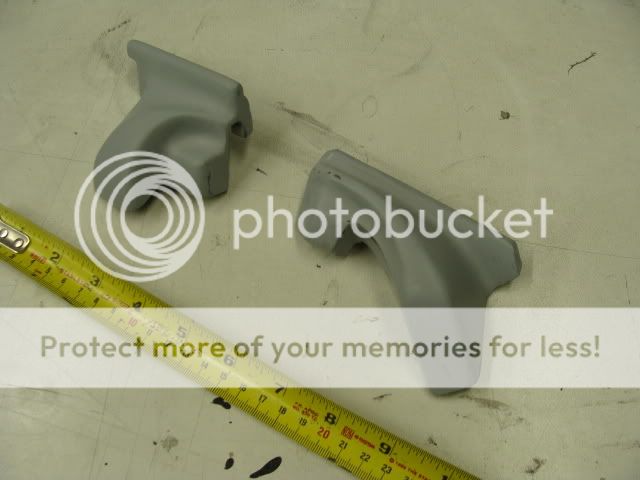
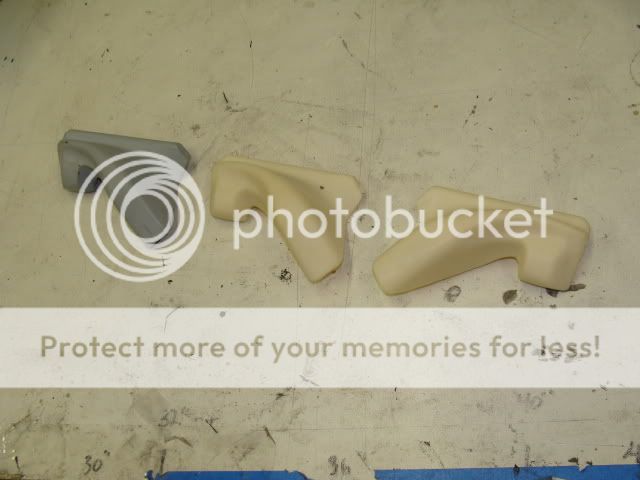
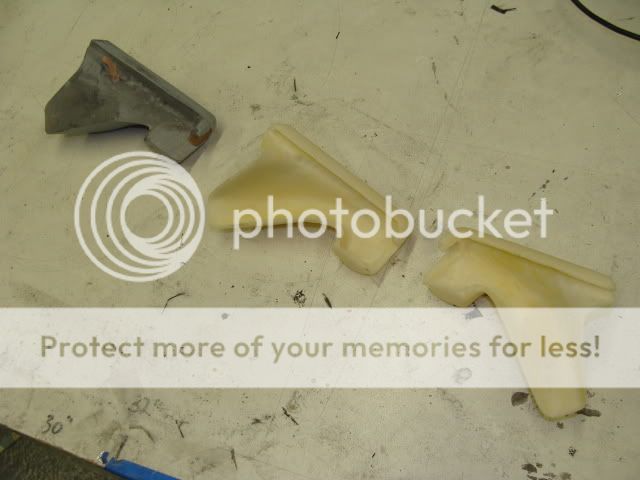
Here are some pictures of the parts. The grey part on the left is the original master. the two white-ish parts are the FDM parts.
Now the really cool thing you can do with the software is assign a material thickness for the part you are making with the FDM machine.
What we have now is a fully functional part we can put on the car to validate fit.
The next step is to make production tools from these FDM models so we can make the real parts out of carbon.
Big progress on the door caps this past week.
You will recall this thread started with the clay modeling of the door caps.
We made rough molds and cast hard urethane models of these clay models.
One of the most difficult things to do in manual prototyping is to make the opposite handed part, or make the right side look just like the left side you modeled.
Fortunately, prototyping is evolving the same way as desktop publishing and photography. Computers have revolutionized everything.
We used a laser scanner to capture the 3d form of these master door caps as a digital model. Here is a screen shot of how the data is captured.
This computer data can be reflected to create a mirror image of the left side I modeled manually.
This is where it gets really cool...
We used what is called an FDM machine (fused deposition modeler) to create the right hand parts in ABS plastic directly from the scan data. Essentially, an FDM machine is a 3d ink jet printer that makes things out of plastic.
It takes the machine about 5 hours to make a door cap, and it is an exact reflection of the left side part. The time this saves and the accuracy it affords is amazing.
Here are some pictures of the parts. The grey part on the left is the original master. the two white-ish parts are the FDM parts.
Now the really cool thing you can do with the software is assign a material thickness for the part you are making with the FDM machine.
What we have now is a fully functional part we can put on the car to validate fit.
The next step is to make production tools from these FDM models so we can make the real parts out of carbon.
That is simply astounding Kip. It's great to see the progress as it unfolds. With your knowledge, your dedication to perfection, and the resources you have available. This will be the best hard top that could possibly be put on the car. And lucky me, I'll get to own two of them! :thumbsup
Last edited:
Never thought I needed a hardtop, but you've changed that. You do amazing work on everything you do. :cheers
GTX1 roof - now in carbon!
First of all: thanks for all the compliments!
Loads of late nights lately (well, I did step out to go to the Joan Jett concert with Emily! Great show!) so I appreciate it!
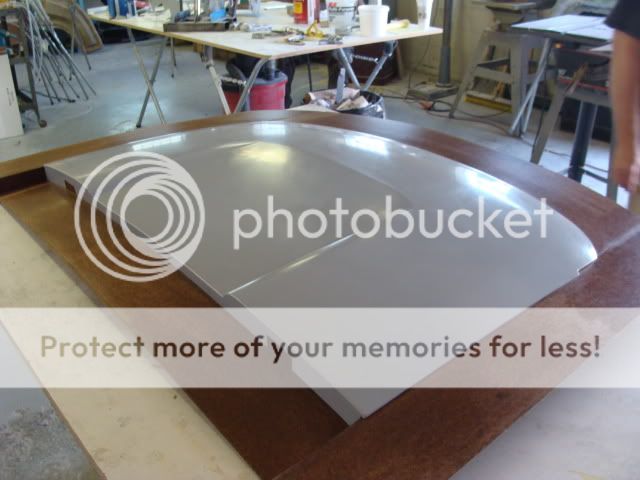
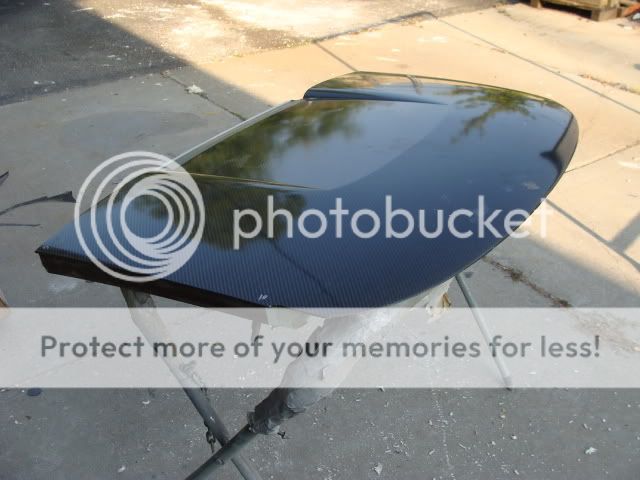
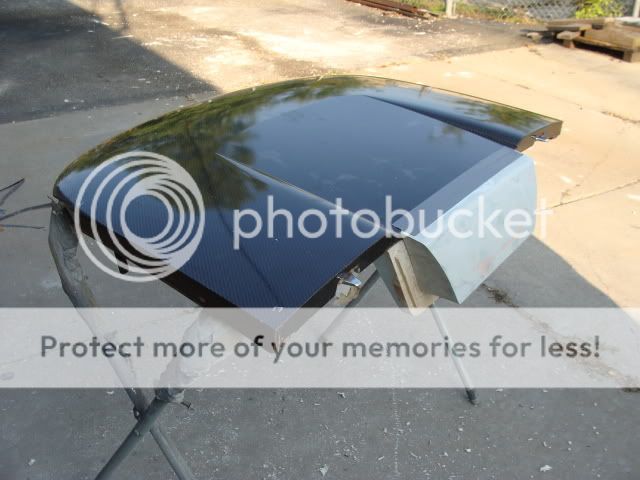
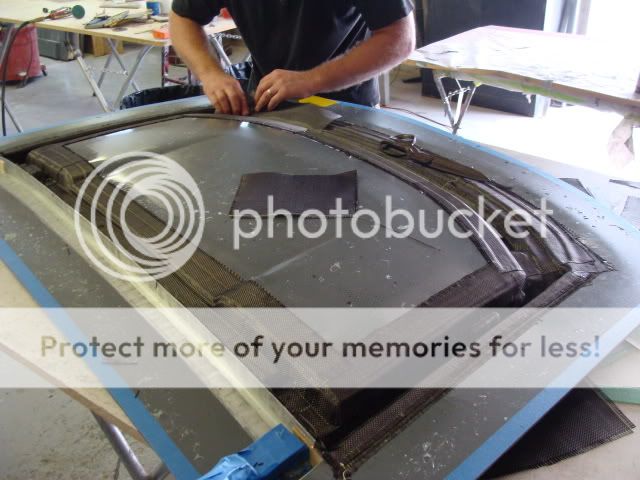
Anyway - we did make the carbon parts for the exterior skin and inner panel for the roof. The parts just turned out great. We used 6 layers of carbon with a sandwiched core. It is soooo still and light!
Here's the exterior skin -
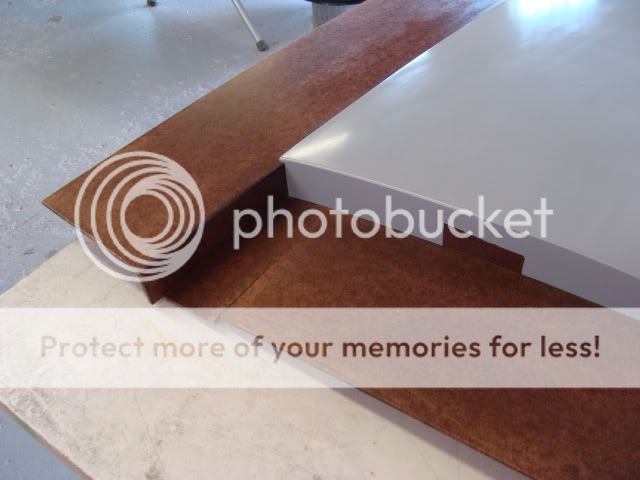
With the exterior skin out of the production tool, we used this to master the sealing surfaces and structure. Everything I posted earlier on this topic showed these surfaces in MDF which was only good for mock-up and validating the design concepts.
Here's a couple pictures of the mastered inner surfaces -
With the surfaces patterned this way, we can fully validate latch performance and fit.
Once we had confidence in the inner panel, we made the mold in the same process as I showed for the exterior panel.
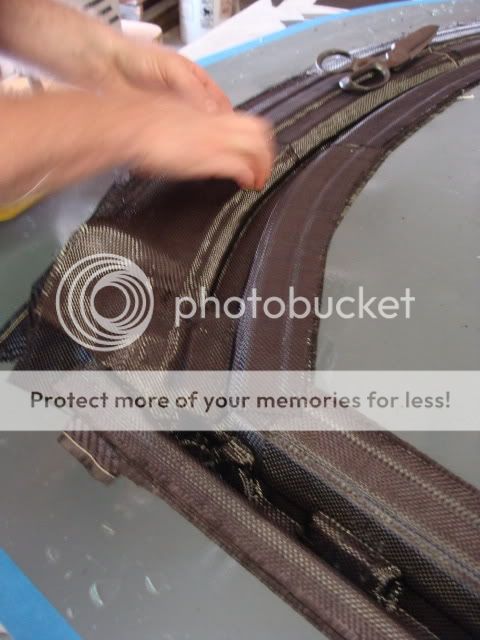
Once the tool was finished, we can now pack the tool with carbon fiber.
With the infusion process we use, we use a light adhesive to position the carbon into the tool.
Unfortunately, I didn't get any photos of us bagging the tool and infusing the resin. Got distracted....
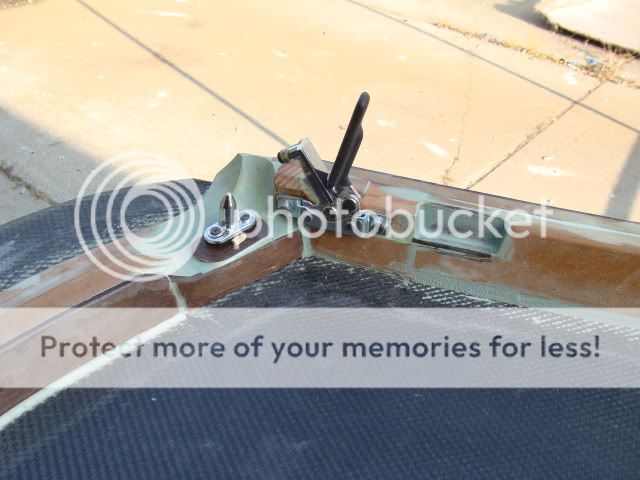
Here's a couple pics of the assembled panel with the rear window pattern in place.
Tomorrow - finish the casting patterns for the header latches, bond the inner and outer panel together, etc. etc.....................................................
First of all: thanks for all the compliments!
Loads of late nights lately (well, I did step out to go to the Joan Jett concert with Emily! Great show!) so I appreciate it!
Anyway - we did make the carbon parts for the exterior skin and inner panel for the roof. The parts just turned out great. We used 6 layers of carbon with a sandwiched core. It is soooo still and light!
Here's the exterior skin -
With the exterior skin out of the production tool, we used this to master the sealing surfaces and structure. Everything I posted earlier on this topic showed these surfaces in MDF which was only good for mock-up and validating the design concepts.
Here's a couple pictures of the mastered inner surfaces -
With the surfaces patterned this way, we can fully validate latch performance and fit.
Once we had confidence in the inner panel, we made the mold in the same process as I showed for the exterior panel.
Once the tool was finished, we can now pack the tool with carbon fiber.
With the infusion process we use, we use a light adhesive to position the carbon into the tool.
Unfortunately, I didn't get any photos of us bagging the tool and infusing the resin. Got distracted....
Here's a couple pics of the assembled panel with the rear window pattern in place.
Tomorrow - finish the casting patterns for the header latches, bond the inner and outer panel together, etc. etc.....................................................
Door cap tools
Today we made the tools for the door caps.
The original plan was to do cavity molds with a male and female side.
After studying the final geomerty of the patterns, I decided it was just too risky to do it that way, due to the fact the parts have a good deal of 'die-lock'. We opted to do a single sided tool out of silicone. It will take a little longer to make the parts, but it will be more fool-proof.
The first step is to model the surface of the tool that extends off of the pattern.
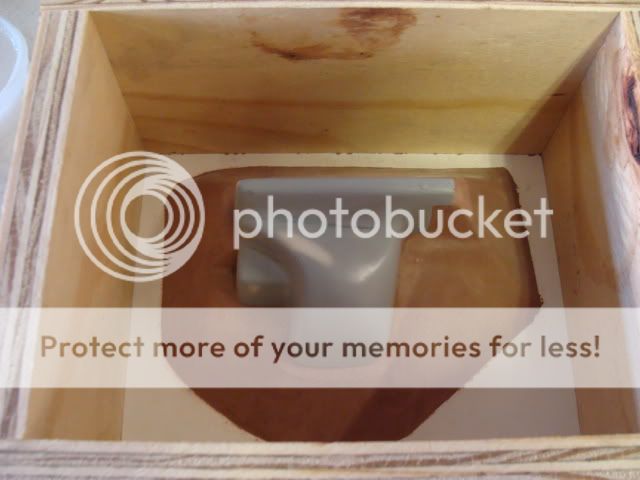
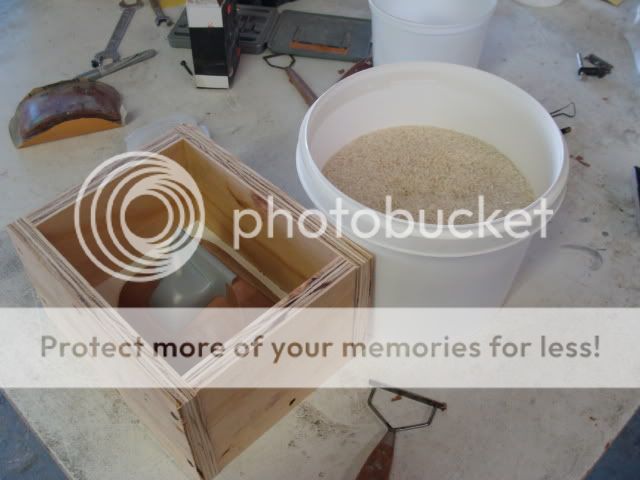
Essentially, we have to extend the surfaces of the pattern. After that, we build a box around the pattern to contain the silicone.
The other thing we need to do is determine the volume of silicone to fill the box with. The silicone we use is pretty darn expensive, so I don't want to waste any. Likewise, mixing too little is a bit of a disaster...
We fill the box with rice, dump it into a cup and thus can measure the volume of silicone required. It is essentially the opposite of what Archimedes did to measure the volume of the king's crown (that was the story, wasn't it?) Instead of measuring the part, we are measuring the volume of the area around it.
After mixing the silicone, we have to de-gas it. Any gas bubbles in the silicone could attach to the surface of the pattern and make for a poor mold. To de-gas the silicone, we put the mixed silicone into our vacuum chamber and suck all the air out of the mix.
Once the silicone is de-gassed, we now pour it into the box. The trick here is to start pouring into the lowest part of the tool. This way, any air that might be left has a chance to rise to the surface.
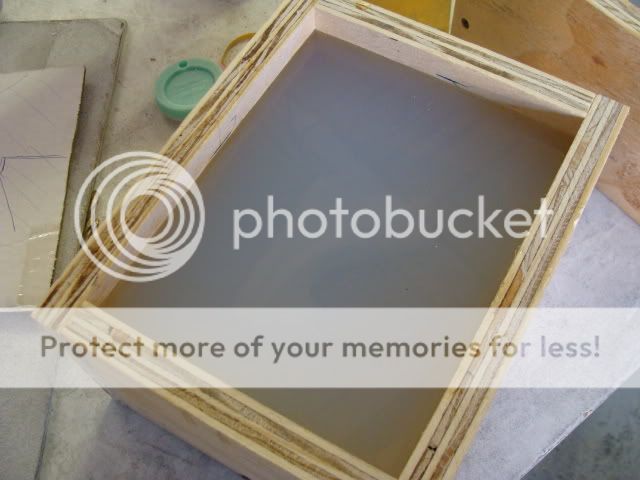
Here's the pattern and box after the pour. You can barely see the master model submerged under the silicone. This will take a good 12 hours or more to fully cure. After that, we dig out the clay and master model and can lay-up a carbon part.
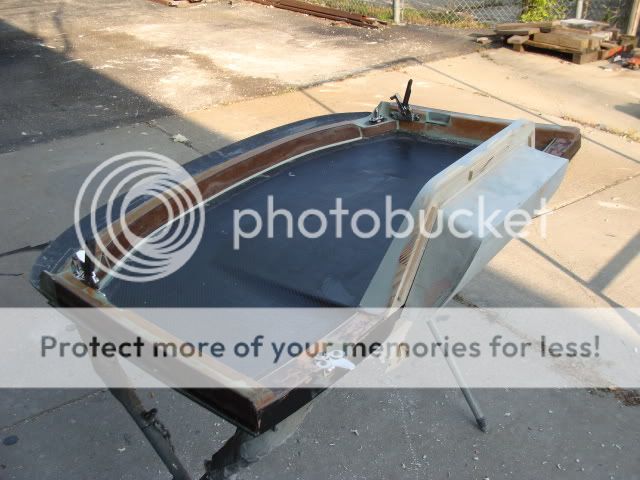
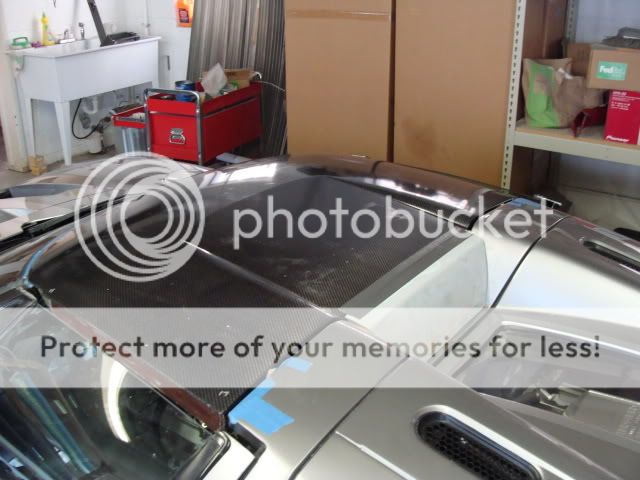
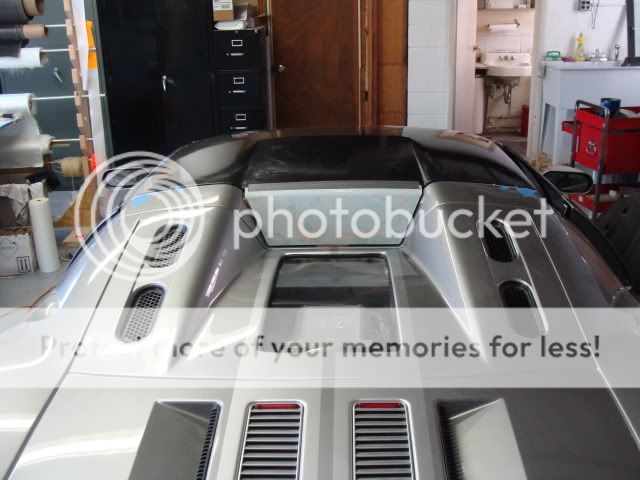
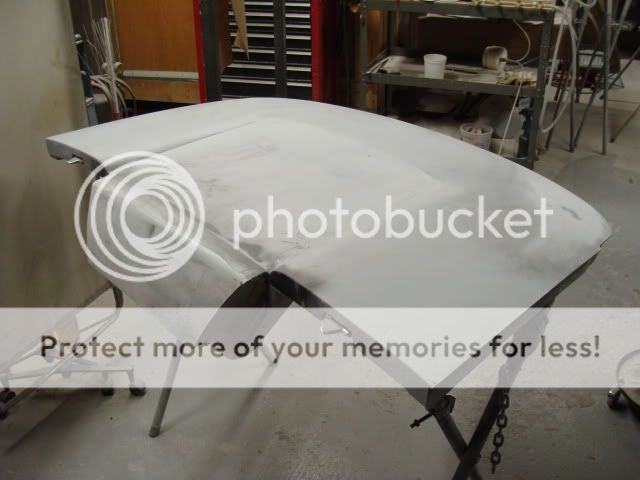
While the cap tools are curing, I surfaced the rear window pattern. Now that the roof panel is finished and we have the hardware on it, we can fit it to the car and finish the window surface.
Here's the roof. Primed with the rear window pattern fit to the roof.
Next step is to make the tool to form the rear window.
Today we made the tools for the door caps.
The original plan was to do cavity molds with a male and female side.
After studying the final geomerty of the patterns, I decided it was just too risky to do it that way, due to the fact the parts have a good deal of 'die-lock'. We opted to do a single sided tool out of silicone. It will take a little longer to make the parts, but it will be more fool-proof.
The first step is to model the surface of the tool that extends off of the pattern.
Essentially, we have to extend the surfaces of the pattern. After that, we build a box around the pattern to contain the silicone.
The other thing we need to do is determine the volume of silicone to fill the box with. The silicone we use is pretty darn expensive, so I don't want to waste any. Likewise, mixing too little is a bit of a disaster...
We fill the box with rice, dump it into a cup and thus can measure the volume of silicone required. It is essentially the opposite of what Archimedes did to measure the volume of the king's crown (that was the story, wasn't it?) Instead of measuring the part, we are measuring the volume of the area around it.
After mixing the silicone, we have to de-gas it. Any gas bubbles in the silicone could attach to the surface of the pattern and make for a poor mold. To de-gas the silicone, we put the mixed silicone into our vacuum chamber and suck all the air out of the mix.
Once the silicone is de-gassed, we now pour it into the box. The trick here is to start pouring into the lowest part of the tool. This way, any air that might be left has a chance to rise to the surface.
Here's the pattern and box after the pour. You can barely see the master model submerged under the silicone. This will take a good 12 hours or more to fully cure. After that, we dig out the clay and master model and can lay-up a carbon part.
While the cap tools are curing, I surfaced the rear window pattern. Now that the roof panel is finished and we have the hardware on it, we can fit it to the car and finish the window surface.
Here's the roof. Primed with the rear window pattern fit to the roof.
Next step is to make the tool to form the rear window.
FYI, Archimedes measured density: Density (d)=Mass(m)/Volume (v). The king wanted to know if his crown was solid gold or not.
Kip,
I am lost for words. What a fantastic job!
The only thing I would like to say is - please tell me you have a number of interns and apprentices?.......the world needs more people like you - we must ensure that your unique skills are passed on to another generation!
Dang - if I wasn't so busy I'd come along myself and offer to work for free just so I could learn how you do what you do!
Well done!
Thank you for your continuing wonderful insight into your project. It also provides an understanding of why "the top" was always the Achilles Heel of the GTX1. :cheers