
Major GTX1 Surgery...
- Thread starter Kip Ewing
- Start date
You are using an out of date browser. It may not display this or other websites correctly.
You should upgrade or use an alternative browser.
You should upgrade or use an alternative browser.
GTX1 roof update
Greetings All
Been working stupid hours last week, so I wan't to motivated to stay up any later to post pics. Here's a chance to get caught up with some image posts.
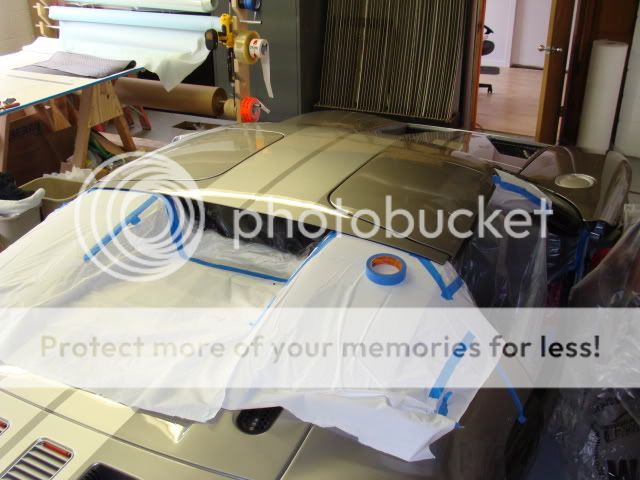
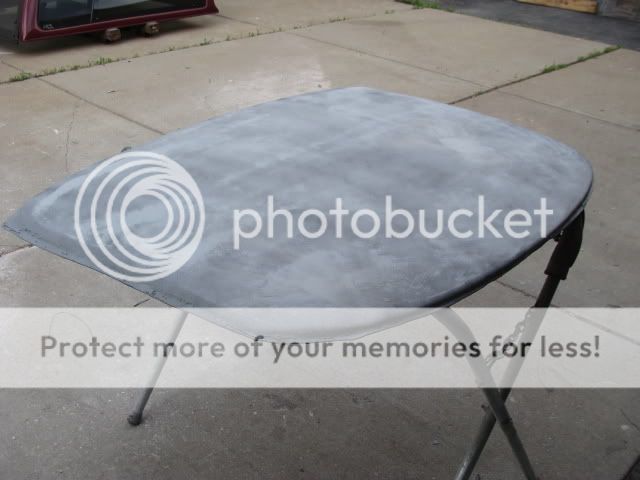
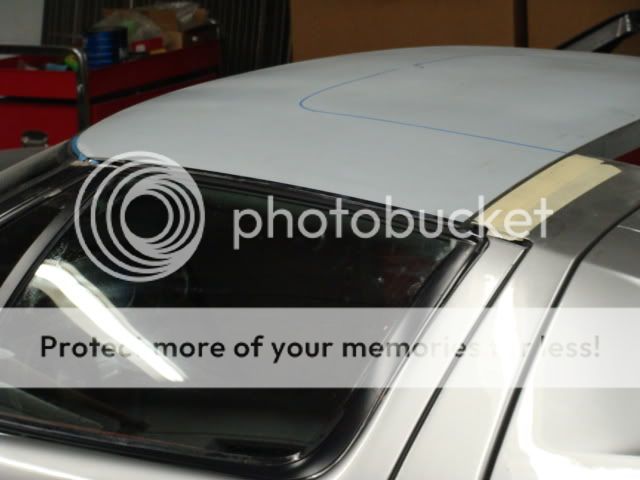
The first photo is a trial fit to understand how the original roof fit and how we wanted to modify it.
There were a number of details that needed to be refined.
The original roof was really thick, and the margins not consistent.
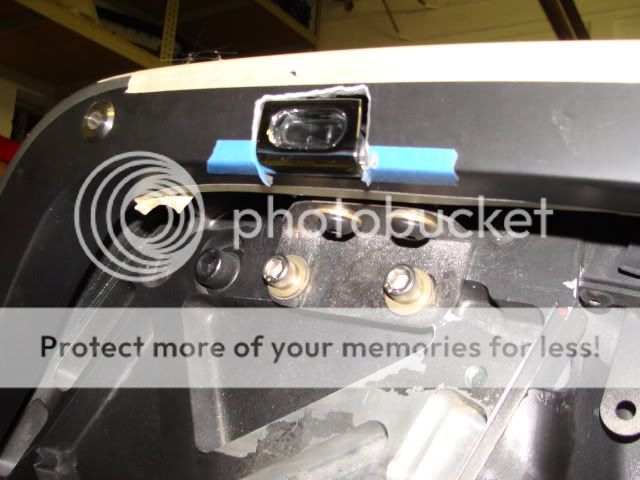
You can see how the cut outs around the pillars have been filled in with Chevaunt clay in this next photo.
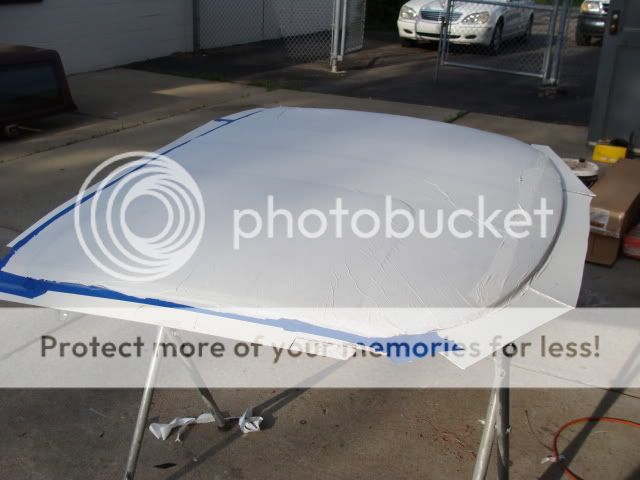
To protect the original roof, I wrapped it with 3m vinyl film. It is the same stuff you see on new cars when they are shipped.
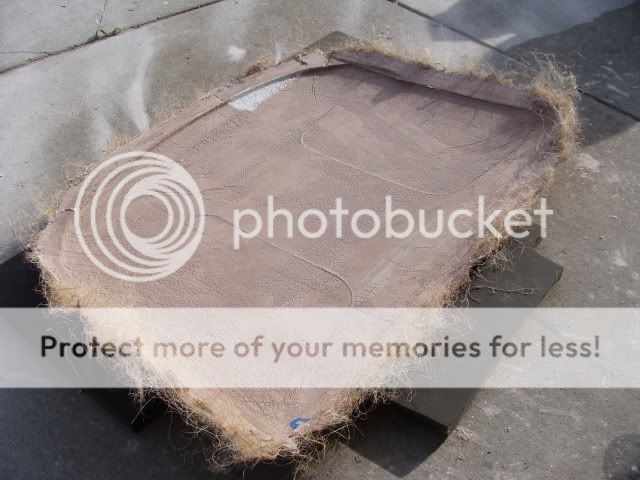
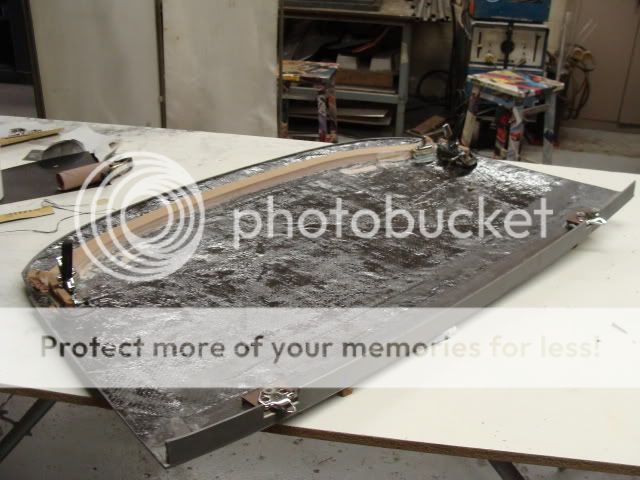
This first mold that I am making is just going to be used once. For these types of tools, I use gypsum cement. It is really dimensionally stable and saves a lot of money vs. a compsosite too. This photo is of the tool after it was pulled off the original roof. The hairy looking stuff is sisal twine. It acts as a reinforcement.
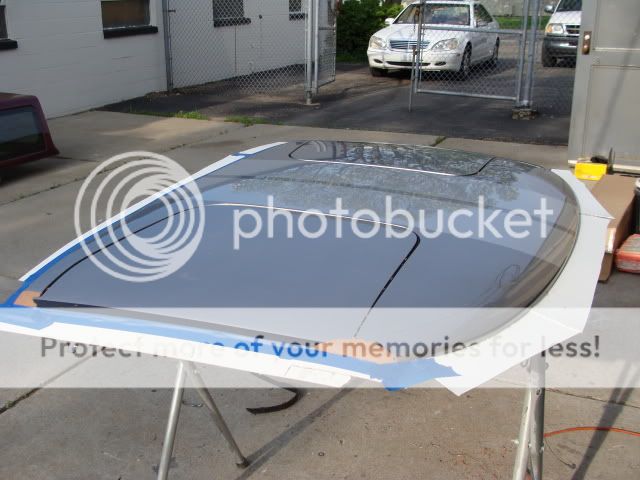
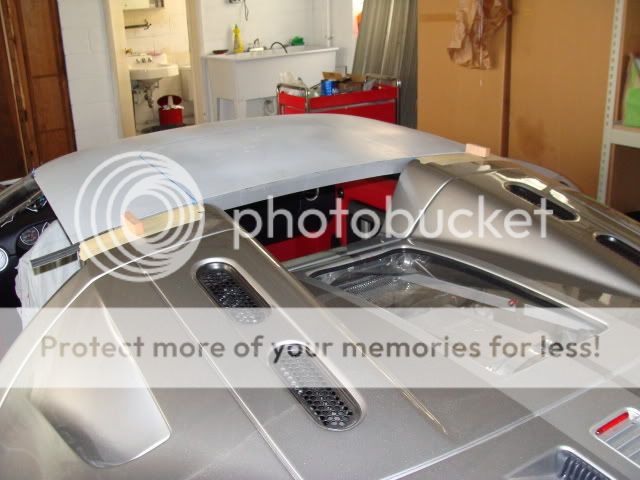
Here's the part out of the tool. This part will be fully surfaced and will be developed as a master part that the production tool will be pulled from.
This week we are fitting this master pattern to the car and tuning the margins to the new door caps we have made.
Greetings All
Been working stupid hours last week, so I wan't to motivated to stay up any later to post pics. Here's a chance to get caught up with some image posts.
The first photo is a trial fit to understand how the original roof fit and how we wanted to modify it.
There were a number of details that needed to be refined.
The original roof was really thick, and the margins not consistent.
You can see how the cut outs around the pillars have been filled in with Chevaunt clay in this next photo.
To protect the original roof, I wrapped it with 3m vinyl film. It is the same stuff you see on new cars when they are shipped.
This first mold that I am making is just going to be used once. For these types of tools, I use gypsum cement. It is really dimensionally stable and saves a lot of money vs. a compsosite too. This photo is of the tool after it was pulled off the original roof. The hairy looking stuff is sisal twine. It acts as a reinforcement.
Here's the part out of the tool. This part will be fully surfaced and will be developed as a master part that the production tool will be pulled from.
This week we are fitting this master pattern to the car and tuning the margins to the new door caps we have made.
Post of the day!
Kip,
Outstanding photos. These are my very favorite threads. When Shadowman, or Rich (GT Guy), or you post a progress report with plenty of photos along with a description, you give those of us who can't do any of that a vicarious understanding along with a most enjoyable read. I know it's time-consuming and a pain in the ass to take the photos and post up like that, but please keep them coming! Thanks Kip, I look forward to seeing you in Texas.
Chip
I agree.
One of the best things about such posts, is that it shows us what is involved in developing new upgrades. My only complaint, is that it sometimes puts too many things on my wish list!
I,m with Chip you guys are so talented and creative as I can't even write my name where people can read it. Keep up the great posts , work and upgrades. I just hope I can afford them on my fixed income. Tomy
Can I be on the list for a hardtop? Black with silver stripe. Will your top fit on all the gtx1's? Or does it have to be custom fitted? I live in Malibu California.
Thanks,
Jeff
Thanks,
Jeff
GTX1 Roof
First of all, thanks to you guys (Chip, Triheart, Kirby) for the compliments.
This one is a lot of work!
Chip, I am definately making Austin.
However, we will have to stretch the Rally into Monday.
There is no way I am going to be in Austin and miss Dale Watson playing at the Continental Club.
Malibu - definately, we can add you to the list.
The top will work on all GTX1s.
However; there is more to it than just the roof.
In order to get the roof to seal, the door caps need revision (see the earlier part of the thread).
Also, until I see how much car-to-car variation there is, I can't say that we won't have to make some adjustments to the roof to have it fit a particular car. Ideally, we'd have access to the car to fit the caps and fit the roof.
Once this roof is finished, we will make a second one to fit on another car or two. We can then see what variation exists and how to address.
Thanks!
Can I be on the list for a hardtop? Black with silver stripe. Will your top fit on all the gtx1's? Or does it have to be custom fitted? I live in Malibu California.
Thanks,
Jeff
First of all, thanks to you guys (Chip, Triheart, Kirby) for the compliments.
This one is a lot of work!
Chip, I am definately making Austin.
However, we will have to stretch the Rally into Monday.
There is no way I am going to be in Austin and miss Dale Watson playing at the Continental Club.
Malibu - definately, we can add you to the list.
The top will work on all GTX1s.
However; there is more to it than just the roof.
In order to get the roof to seal, the door caps need revision (see the earlier part of the thread).
Also, until I see how much car-to-car variation there is, I can't say that we won't have to make some adjustments to the roof to have it fit a particular car. Ideally, we'd have access to the car to fit the caps and fit the roof.
Once this roof is finished, we will make a second one to fit on another car or two. We can then see what variation exists and how to address.
Thanks!
Hi Kip,
My GTX1 is available to you in the so calif area. I also had a convt top made for my car. A top shop in Cathedral City Ca. did the work. My cell 310 892-7043.
Jeff
My GTX1 is available to you in the so calif area. I also had a convt top made for my car. A top shop in Cathedral City Ca. did the work. My cell 310 892-7043.
Jeff
More GTX1 Major Surgery
Here's an update on the hardtop;
There have been two things that have been pretty difficult with this project;
1) figuring out a sealing system to design and fab.
2) figuring out the best way to locate and latch the roof.
The first post covered some of the early work on the sealing.
This post will cover the locating and latching problem.
I have a general rule I try to follow on these things. Focus your attention on your unique problems, not the ones someone else has already solved. Hinges, latches, etc. all fall in that category. Some other much larger company has probably invested a ton of money in validating and tooling a solution you can use. In this case, I had to find a latching system that lent itself to the unique constraints of the GTX1.
I investigated quite a few different vehicles, bought latches to review, etc. and then had a bit of a revelation. The GTX1 targa is pretty much just a GenIII Corvette T-top turned sideways. I bought a set of latches and guide pins and some convertible guide pins, too. This affords me a whole system of parts that have been validated for a similar application and are readily off the shelf.
The other big task was to come up with a system of integrating these parts into the GT and allowing for any potential build variation of the GTX1s.
The really critical part is the header latch receiver. These have to be made unique to the GTX1. Lucky enough, the header casting has a few locator holes that were part of the original fixturing. I have repurposed these master locators as riv-nut locations that my latch receivers will mount to. It gives us a datum point that is the same on all subsequent GTX1s.
Here's a top view of the latch receiver mock ups.
Notice it integrates the Corvette receiver bushing.
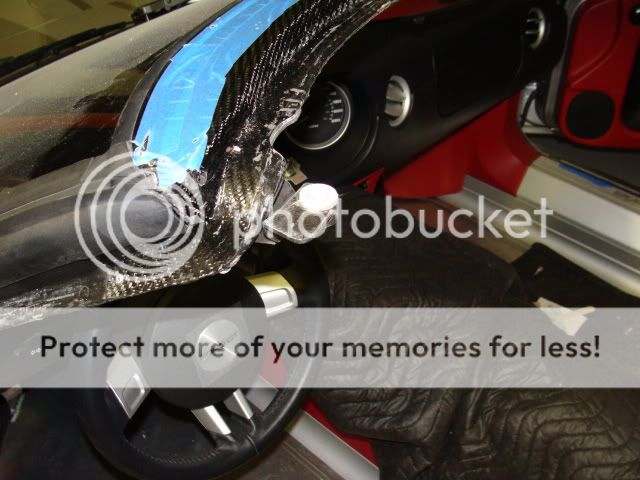
Here's a view from inside the car.
These steel mock-ups will be turning into casting paterns to have the production ones produced in cast aluminum. I spent the better part of a week fabricating about three sets of these things before I was happy with this solution.....
Once the receivers are in place, the associated guide pin and latch must be located on the roof side. Here we see the mock up of the guide pin and latch locations on the roof pattern.
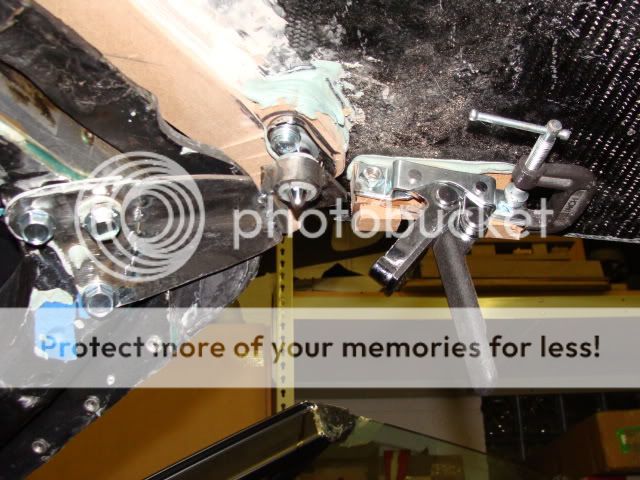
For the other side of the roof, I am using the Corvette T-top guide pins and receivers. This was a really cool 'happy accident'. The Corvette part looks like it was designed specifically for the GTX1!
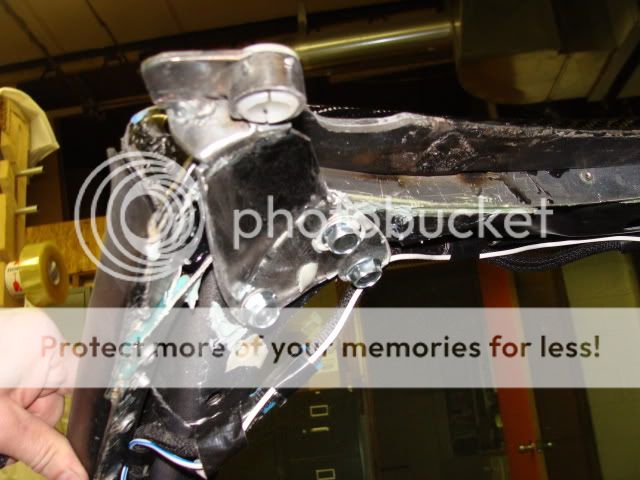
I had to made brackets that allowed for the load path to go into the structural bulk head, rather than take the easy route and have it mount to the composite exterior panel. The bulkheads of the GTX1s were all CNC aluminum. This gives a repeatable datum at the back of the car, which should work as well as the header casting, to provide some repeatiability with fixturing. These new brackets allow for adjustment in 3 planes to provide for any variation of the exterior panel relative to the frame.
Here you can see all of the components located on the roof pattern for mock-up. We use a lot of MDF and body filler at this stage. It allows for a stable surface that we can mount the hardware to. By mocking things up like this, we can validate the installation and function of the guide pins and latches.
Next step is to mock up the seal planes. After this we can make the rear window and then tool up the roof!
Here is the roof pattern on the car.
More to come!
Here's an update on the hardtop;
There have been two things that have been pretty difficult with this project;
1) figuring out a sealing system to design and fab.
2) figuring out the best way to locate and latch the roof.
The first post covered some of the early work on the sealing.
This post will cover the locating and latching problem.
I have a general rule I try to follow on these things. Focus your attention on your unique problems, not the ones someone else has already solved. Hinges, latches, etc. all fall in that category. Some other much larger company has probably invested a ton of money in validating and tooling a solution you can use. In this case, I had to find a latching system that lent itself to the unique constraints of the GTX1.
I investigated quite a few different vehicles, bought latches to review, etc. and then had a bit of a revelation. The GTX1 targa is pretty much just a GenIII Corvette T-top turned sideways. I bought a set of latches and guide pins and some convertible guide pins, too. This affords me a whole system of parts that have been validated for a similar application and are readily off the shelf.
The other big task was to come up with a system of integrating these parts into the GT and allowing for any potential build variation of the GTX1s.
The really critical part is the header latch receiver. These have to be made unique to the GTX1. Lucky enough, the header casting has a few locator holes that were part of the original fixturing. I have repurposed these master locators as riv-nut locations that my latch receivers will mount to. It gives us a datum point that is the same on all subsequent GTX1s.
Here's a top view of the latch receiver mock ups.
Notice it integrates the Corvette receiver bushing.
Here's a view from inside the car.
These steel mock-ups will be turning into casting paterns to have the production ones produced in cast aluminum. I spent the better part of a week fabricating about three sets of these things before I was happy with this solution.....
Once the receivers are in place, the associated guide pin and latch must be located on the roof side. Here we see the mock up of the guide pin and latch locations on the roof pattern.
For the other side of the roof, I am using the Corvette T-top guide pins and receivers. This was a really cool 'happy accident'. The Corvette part looks like it was designed specifically for the GTX1!
I had to made brackets that allowed for the load path to go into the structural bulk head, rather than take the easy route and have it mount to the composite exterior panel. The bulkheads of the GTX1s were all CNC aluminum. This gives a repeatable datum at the back of the car, which should work as well as the header casting, to provide some repeatiability with fixturing. These new brackets allow for adjustment in 3 planes to provide for any variation of the exterior panel relative to the frame.
Here you can see all of the components located on the roof pattern for mock-up. We use a lot of MDF and body filler at this stage. It allows for a stable surface that we can mount the hardware to. By mocking things up like this, we can validate the installation and function of the guide pins and latches.
Next step is to mock up the seal planes. After this we can make the rear window and then tool up the roof!
Here is the roof pattern on the car.
More to come!
Last edited:
DanQ
GT Owner
Kip, As others have mentioned, thanks for the updates! I don't own a GTX1 but I really enjoy your process updates. Thanks so much for taking the time to post the pictures and descriptions.
Here's an idea for another project, like you don't already have enough going on.") I was thinking about adapting your center console armrest/ cubby to house 2 popup cup holders...
I was thinking about adapting your center console armrest/ cubby to house 2 popup cup holders...
Here's an idea for another project, like you don't already have enough going on.
I was thinking about adapting your center console armrest/ cubby to house 2 popup cup holders...GTX1 major surgery
Thanks Kirby
I am really happy with the direction it is taking.
I am doing the seal planes to the glass, at the moment.
Ready to get this one finished!
Thanks Kirby
I am really happy with the direction it is taking.
I am doing the seal planes to the glass, at the moment.
Ready to get this one finished!
Cold one
I won't turn that down!
Thanks!
Kip, I have always admired your work from a distance, as I do not own a GTX1, but I just have to say how impressive your talents are.
I look forward to meeting you at Rally IV and buying you a cold one! :thumbsup
I won't turn that down!
Thanks!
Door seal planes modeled
OK, this weekend I modeled seal mounting planes for the door glass.
We are using the door seals off the current model Mustang.
Again, there is no point in inventing a solution to a problem someone has solved with more resources. The Mustang has frameless door glass, and the seals work really well. Problem solved. We just need to adapt them to our purpose.
We start with a section of Mustang door glass seal to see how it needs to be oriented to the door glass.
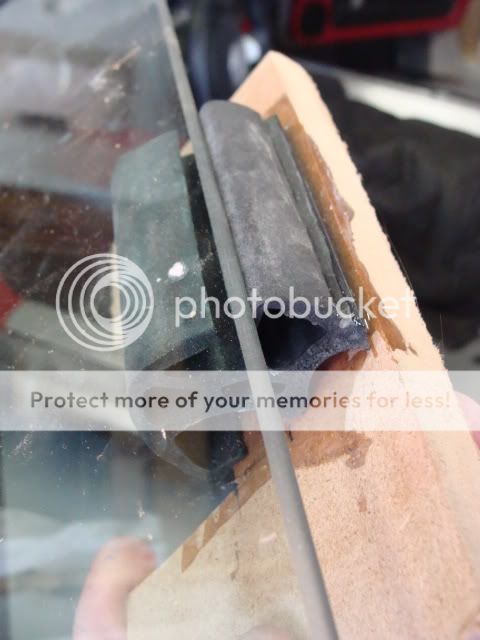
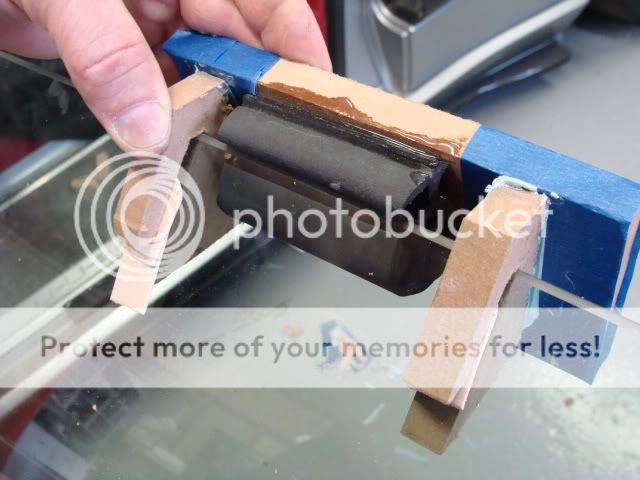
When I worked at ASC, I got a good piece of advice about designing sealing systems, "You can do two things: seal water, and manage water." In other words, you can seal water, but you also will have some leaks and have to manage how it drains out. You can see from this picture of the Mustang seal that there is a bulb that seals against the top of the glass and then there is a lip that forms a drain trough below the primary seal. The glass only compresses the seal a few millimeters, so you have to be pretty accurate in how it is positioned.
To figure this positioning out, I make these little "saddles" that we'll use to position a section of seal against the glass.
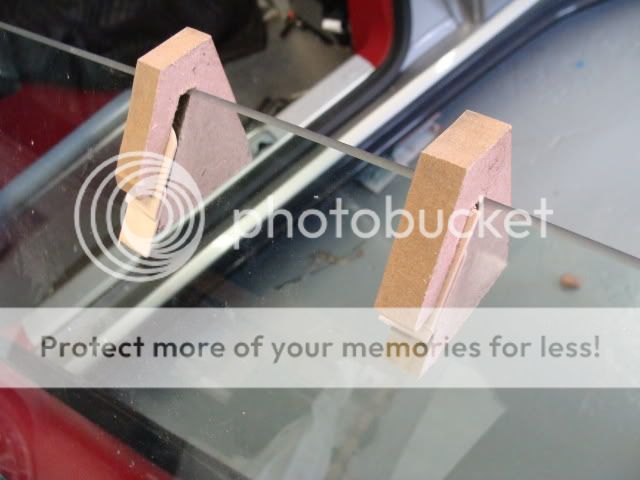
Now we can position our section of seal against these "saddles" and verify that we can correctly position the seal against the door glass.
Once we have the correct geometry on the "saddles" we can make a few of these and hang them across the door glass. The door glass surface is a compound curve, so these "saddles" take a different orientation across the plane of the glass.
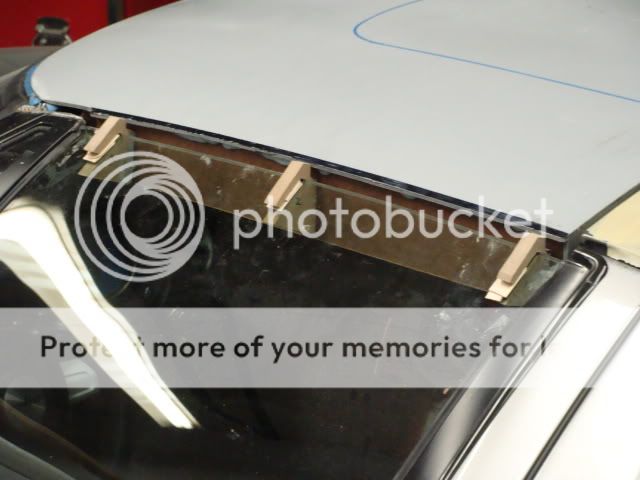
From this photo, you can see that with the door closed, the "saddles" indicate the surface that the seal has to mount to relative the to roof. pattern.
We now position a section of hardboard against the "saddles" and bond the hardboard to the roof pattern.
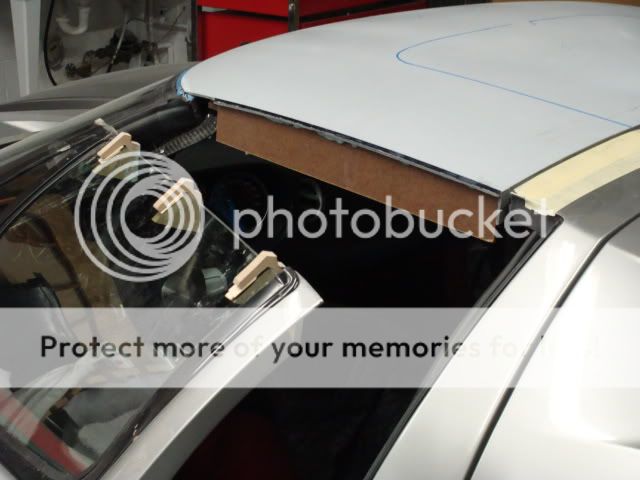
With the door now open, you can see how the seal mounting plane has been transfered from these "saddles" to an actual surface on the roof pattern.
We then mounted a full section of Mustang door seal on our new seal mounting plane to check for fit.
It fit perfectly. (whew!)

OK, this weekend I modeled seal mounting planes for the door glass.
We are using the door seals off the current model Mustang.
Again, there is no point in inventing a solution to a problem someone has solved with more resources. The Mustang has frameless door glass, and the seals work really well. Problem solved. We just need to adapt them to our purpose.
We start with a section of Mustang door glass seal to see how it needs to be oriented to the door glass.
When I worked at ASC, I got a good piece of advice about designing sealing systems, "You can do two things: seal water, and manage water." In other words, you can seal water, but you also will have some leaks and have to manage how it drains out. You can see from this picture of the Mustang seal that there is a bulb that seals against the top of the glass and then there is a lip that forms a drain trough below the primary seal. The glass only compresses the seal a few millimeters, so you have to be pretty accurate in how it is positioned.
To figure this positioning out, I make these little "saddles" that we'll use to position a section of seal against the glass.
Now we can position our section of seal against these "saddles" and verify that we can correctly position the seal against the door glass.
Once we have the correct geometry on the "saddles" we can make a few of these and hang them across the door glass. The door glass surface is a compound curve, so these "saddles" take a different orientation across the plane of the glass.
From this photo, you can see that with the door closed, the "saddles" indicate the surface that the seal has to mount to relative the to roof. pattern.
We now position a section of hardboard against the "saddles" and bond the hardboard to the roof pattern.
With the door now open, you can see how the seal mounting plane has been transfered from these "saddles" to an actual surface on the roof pattern.
We then mounted a full section of Mustang door seal on our new seal mounting plane to check for fit.
It fit perfectly. (whew!)