Shadowman's New Year's "How To Project"


Aug 25, 2006
4,436
Well; the following is certainly not for everyone and yet for anyone that has removed a pair of front inner fenders liners they will likely appreciate this project.

When asked what one of the most difficult as well as risky items to tend to on these gals the removing of the front inner fender liners always comes up. They are awkward to remove, even for those such as myself that have done it many times and every time it is done there is the risk of inner fender lip damage if not done so very carefully. It is as the direct result of this that nearly 2 years ago I tested the cutting and sectioning of the front inner fender liners and after a few twist and tweaks found that it could be accomplished in a consistent manner with little or no associated risk; this being after the one piece inner fender liners have been removed.

Now let me say that I do not encourage one to remove their inner fender liners solely to complete this process but rather if you have a reason to remove your front inner fender liners then this IMO is a very worthy consideration.

The process will take a couple hours and requires a second set of inner fender liners at a cost of approximately $425.00 retail (for the pair) however once complete the installation and removal of them in the future is a breeze and no associated risk of damage.

Once the process has been completed the OEM retainers will be used in exactly the same locations as when a one piece inner fender liner and as you will see in the pictures it will appear within the wheel well as if OEM; they fit and perform their task perfectly.

Takes care

Shadowman

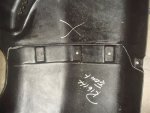
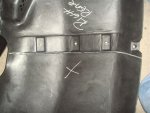
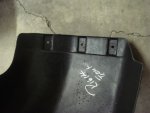
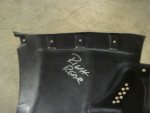
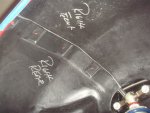
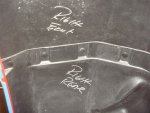
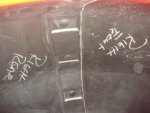
The first two pictures are of the OEM liners being made ready for sectioning

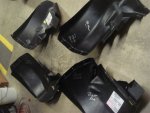
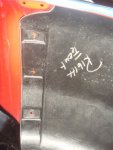
The third picture is of all 4 pieces rough cut

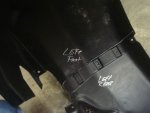
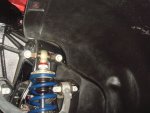
The forth picture is a dry fitting prior to the final clean-up on the edges

The fifth and sixth pictures are the sectioned pieces ready to be installed

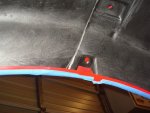
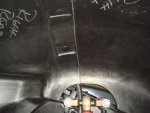
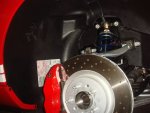
The next eight pictures are of the installation process

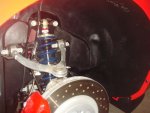
The last two are of the sectioned inner fender liners installed as if OEM
 

Attachments

  • DSC02275.JPG
    DSC02275.JPG
    66.1 KB · Views: 603
  • DSC02277.JPG
    DSC02277.JPG
    68.1 KB · Views: 608
  • DSC02283.JPG
    DSC02283.JPG
    54.6 KB · Views: 606
  • DSC02286.JPG
    DSC02286.JPG
    40.6 KB · Views: 606
  • DSC02298.JPG
    DSC02298.JPG
    45 KB · Views: 601
Last edited:
Continued
 

Attachments

  • DSC02326.JPG
    DSC02326.JPG
    38.8 KB · Views: 596
  • DSC02300.JPG
    DSC02300.JPG
    30.8 KB · Views: 594
  • DSC02301.JPG
    DSC02301.JPG
    60 KB · Views: 592
  • DSC02329.JPG
    DSC02329.JPG
    67.1 KB · Views: 596
  • DSC02331.JPG
    DSC02331.JPG
    61.3 KB · Views: 593
Last edited:
continued
 

Attachments

  • DSC02332.JPG
    DSC02332.JPG
    61.6 KB · Views: 587
  • DSC02333.JPG
    DSC02333.JPG
    64.5 KB · Views: 588
  • DSC02337.JPG
    DSC02337.JPG
    60.6 KB · Views: 581
  • DSC02341.JPG
    DSC02341.JPG
    62.6 KB · Views: 580
Last edited:
The finished results are as presented; OEM in appearance and operation however from a service standpoint IMO phenominal.

I share this process because I have successfully converted many gals as well as assisted other's convert their gal and hope that this tech tip helps many others too because I have seen far too many gal's with inner fender lip damage caused during the process of removing and installin the inner fender liners.

Now I purposely left my marks and notes within the inner fender liners for these pictures however if I had wiped the silver magic marker off and removed the remaining stickers they would appear as if they had never been touched.

All the best

Shadowman
 

Attachments

  • DSC02338.JPG
    DSC02338.JPG
    54.3 KB · Views: 581
  • DSC02340.JPG
    DSC02340.JPG
    54.5 KB · Views: 579
Last edited:
Shadowman....It's New Years Day....take the day/night off for Christ sake.


Happy New Year BTW.......


P.S.You already did this to my gal didn't you:wink

P.S.S. my mirror works waaaaaaay better after your recent mod
 
Last edited:
Shadowman....It's New Years Day....take the day/night off for Christ sake.

P.S.You already did this to may gal didn't you:wink

P.S.S. my mirror works waaaaaaay better after your recent mod


LOL a day off; what is that?

Now as for your gal; yes sir she previously received this tweak and now with regrads too the most recent tweak to our previous modification; I am truly very happy for you.

Good night my friend and "Happy New Year" to you and to the rest of the folks that frequent our Forum.


Shadowman
 
Great post, thanks for sharing.
I know you walked EVAN through this.
You make this place great.

HAPPY NEW YEAR to the SHADOW crew:-)
 
Indeed sir, looking forward to many more informative posts from the one and only Shadowman.


Endorsement checks can be sent to Delta Bail Bonds, Dallas, TX.
 
At first, I thought why would I ever want to remove my inner fender liners? Then I remembered the dredded gas filler neck replacement issue.:frown

Gee, you California guys are lucky to have Shadowman living in your back yard.

Bill, any chance you'll be moving to Chicago any time soon?

Nice post, thanks for sharing.:thumbsup
 
Heed Shadowmans warning in this folks.....He did this mod to my car AFTER the local Ford dealer bent the inner lip of my fender..so much that they cracked it:eek

Might seem like something you don't need now.....but you will need to do at some point for sure.
 
Last edited:
I see a rush on fender liners about to happen.
 
Great post and very informative - as usual for Bill!

I'm wondering, Bill, if you have ever tried gently heating the fender liners to make them more pliable? I'm wondering if temperature has something to do with it... as we haven't had near the struggle as others have seem to have had. With a couple of little tricks (like removing the 2-3 front-most rocker panel screws) and following the repair manual recommendation to "bend" the panel in the middle to clear it from the fender lip, they have come out without a lot of drama. Once clear of the fender lip, we end up rotating them counter clockwise all the way around to get them out of the wheel well.

Anyway, I haven't tried heating them either - but maybe this is one element that makes some easier than others.

We just had one out last week - in the process to remove the entire fender. While it may be possible to replace the fuel filler neck without removing the fender, I assure you that you cannot replace the gas cap that way (as I am sure you know!)

So, anyone thinking about one of the cool looking gas caps - don't forget to figure in non-trivial installation costs! (This is Forum member's car with a whopping 283 miles on the odo!)

PassFender.JPG
 
  • Like
Reactions: Waldo
Happy New Year Kendall,
I thought I read that the gas cap can be changed, as well as the filler spout without removing the fender? Kindly comment.
God Bless America,
DANIEL
 
this is a great post, thank you shadowman you I will be performing this upgrade shortly as my parts are due back from the painter.:thumbsup
 
Hi Daniel,

Happy New Year to you and family as well!

You can see in my picture that there is a sheetmetal substructure that the filler tube assembly (shown in place) screws into. The decorative gas cap lid actually screws onto the fender itself from the underside. The trouble is that this sheetmetal substructure for the filler blocks your access to the (3) screws that hold the decorative gas cap lid in place. That is, there is only the smallest gap between the fender itself and this substructure. Perhaps Shadowman has a trick or two up his sleeve but mere mortals like me end up having to remove the fender!
 
nota4re , Would it be possible to take a video of the safe way to remove the liners next time you have the need to do it ?

AJK
 
Great post and very informative - as usual for Bill!

I'm wondering, Bill, if you have ever tried gently heating the fender liners to make them more pliable? I'm wondering if temperature has something to do with it... as we haven't had near the struggle as others have seem to have had. With a couple of little tricks (like removing the 2-3 front-most rocker panel screws) and following the repair manual recommendation to "bend" the panel in the middle to clear it from the fender lip, they have come out without a lot of drama. Once clear of the fender lip, we end up rotating them counter clockwise all the way around to get them out of the wheel well.

Anyway, I haven't tried heating them either - but maybe this is one element that makes some easier than others.

We just had one out last week - in the process to remove the entire fender. While it may be possible to replace the fuel filler neck without removing the fender, I assure you that you cannot replace the gas cap that way (as I am sure you know!)

So, anyone thinking about one of the cool looking gas caps - don't forget to figure in non-trivial installation costs! (This is Forum member's car with a whopping 283 miles on the odo!)

PassFender.JPG

I replaced the gas cap on my own car myself without removing the fender! Take off the wheel, remove the inner splash shield. That will get you to 2 of the 3 screws. Next, remove the bolts holding the fender along the trunk seam. I think there were 5. You don't need to loosen any other bolts. Then carefully place a shim to open the seam about an inch or so. With blankets on the fender and a mirror you can see and remove the last screw. This way you don't have to re-align the fender when done. I can't tell you how tempting it is to drill an access hole in the support to access the screw! But it isn't necessary if you're patient. I was telling a friend of mine (he was production manager for the GT program with Saleen) and he said he had actually used the same procedure! :thumbsup
 
Hi Daniel,

Happy New Year to you and family as well!

You can see in my picture that there is a sheetmetal substructure that the filler tube assembly (shown in place) screws into. The decorative gas cap lid actually screws onto the fender itself from the underside. The trouble is that this sheetmetal substructure for the filler blocks your access to the (3) screws that hold the decorative gas cap lid in place. That is, there is only the smallest gap between the fender itself and this substructure. Perhaps Shadowman has a trick or two up his sleeve but mere mortals like me end up having to remove the fender!

Just don't forget that old urban tale post about the gas cap gasket!

nota4re, thanks as your pic finally shows where it is mounted! That gasket sits inside the gas cap mounting screws....
 
I replaced the gas cap on my own car myself without removing the fender! Take off the wheel, remove the inner splash shield. That will get you to 2 of the 3 screws. Next, remove the bolts holding the fender along the trunk seam. I think there were 5. You don't need to loosen any other bolts. Then carefully place a shim to open the seam about an inch or so. With blankets on the fender and a mirror you can see and remove the last screw. This way you don't have to re-align the fender when done. I can't tell you how tempting it is to drill an access hole in the support to access the screw! But it isn't necessary if you're patient. I was telling a friend of mine (he was production manager for the GT program with Saleen) and he said he had actually used the same procedure! :thumbsup

Thanks, I recall reading on the board that you can replace the filler and cap without removing the fender.:biggrin I have the cap, and have yet to ask
Evan Guyett to do the install.:wink
 
I have the cap, and have yet to ask
Evan Guyett to do the install.:wink

One from ebay?