This I truly understand
When fall comes have them chemically cleaned and then coated and you will retain the present look
Takes care
Shadowman
You know I will and thanks for the advise:thumbsup
This I truly understand
When fall comes have them chemically cleaned and then coated and you will retain the present look
Takes care
Shadowman
We won't know until we see how long the machining process will be but I don't expect too much of a difference in price.


I installed both sets tonight. The fitment was perfect. You guys really went all out making sure everything lined up. It would be easy to get the mounting holes off a little which would be a PIA, but everything went smooth.
I'm glad I bought these. My originals were not only slightly warped, they were cracked quite badly at the bottom mounts and one of the screw posts was actually broken off. It was just a matter of time until they fell apart. This was on the '05 with 7000 miles.
Now I have to buy another set for the other car since I know the stock ones won't hold up.:ack
Thanks again.:thumbsup
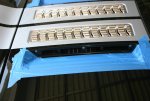
Found my set waiting for me when I got home last night, went out in the garage and installed after dinner. They are beautifully made and fit perfect. I found that I needed to open the clam shell to check and make sure the tabs were on correctly, a couple of strips of the blue tape held the vents in the right spot so they didn't fall off while I checked. Great work! What's next...?
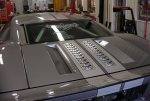
clear coat is done,and vents are findley on
Very nice!!!!:eek I also like the added pin stripe. Did you do a black finish under the top vents or did you leave them the color of the stripe?
Just a foot note: I put a piece of black vinyl under the billet vents when I did mine and it really brings out the bling:willy