Been wanting to install a rear view back up camera in the 2006 Ford GT for a while now. Found parts online and had my aerospace engineer and longtime friend Scott install.
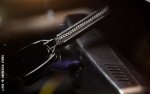
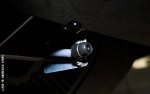
We looked at various mounting possibilities and decided to go for the passenger side, above the diffuser. He crafted a custom bracket out of 2024 aluminum for the bullet camera.
• Installation summary (Front to Rear)
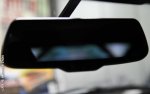
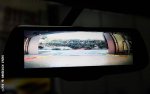
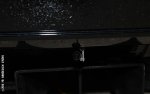
o Mirror/display installed onto stock rear view mirror bracket
o Wiring run above headliner, down the right A-pillar, constant/switched/ground/camera ground/reverse connected in passenger footwell, camera harness with power and ground wires (twisted pair) tucked under the right scuff plate, up the right B-pillar, through the existing grommet behind the right seatbelt retractor, downward to the frame rail and back to the rear following existing harness routing and into the right rear bumper crush rail
o Camera attached to right rear bumper crush rail (frame extension) with custom aluminum bracket
• Vehicle Prep
o Lower windows and unlock vehicle
o Disconnect battery
• Let car sit for fifteen minutes to bleed off any residual energy
o Remove door seals
• Right side full
• Left side partial (just to remove headliner)
o Remove headliner
• Remove sun visors (4 screws) and hood release (3 screws)
• Remove rear headliner (removal required to release the front one)
• Remove front headliner
o Remove A-pillar trim panel
o Cowl side trim panel left in place (Scuff plate restricts removal)
o Remove B-pillar upper trim panel
o B-pillar lower trim panel left in place (Scuff plate restricts removal)
o Scuff plate removal would facilitate finding the reverse wire, but the attachment screws are underneath the scuff plate insert and its removal pretty much destroys the insert. Chose not to destroy the scuff plate and accessed the reverse wire on the back side of the Smart Junction Box. Alternately, you can run an additional wire all the way to the rear backup light harness, but it’s not as clean an install with the extra wire running the length of the car. Looked for an easier to access harness bundle with the reverse wire, but gave up after searching for a few hours. Harness runs under scuff plate and through the frame itself…
o Disconnect safety belt pretensioner electrical connector
o Loosen oil reservoir as it will need to be pushed aside to access pass through grommet
o Raise right rear of vehicle and remove the right rear wheel. Harness routing is directly behind the wheel on the inner side of the frame rail.
o Remove the right wheel opening cover (horizontal cover behind wheel) to access crush rail
• Smart Junction Box (SJB) Access
o Wear an ESD strap as some of the modules are ESD sensitive
o Remove SJB cover
o Remove SJB bracket bolts
o Remove Inertial Fuel Switch mounting bolts to free up vehicle wiring harness
o Disconnect bulkhead connector
o Coerce SJB out to enable disconnection of rear electrical connectors
o Smart Junction Box circuit identification for reverse
• For Positive Trigger
• CKT 140 (BK/PK) is the positive trigger (goes to >10V when brake depressed)
o This is the positive voltage output to the reversing lamp
• For Negative trigger (Not common)
• CKT 1789 (VT/WH) is the negative trigger (goes to ground when brake depressed)
o This is the relay signal coming from the reversing lamp switch
• Harness
o Good practice to ground the camera ground at the same location as the mirror/display ground to prevent any chance of having to run the extra wire after determining you have a ground loop issue
o Twist the camera power and ground lines if not already using a twisted pair. Twisted shielded is even better.
o Constant and switched power can easily be tagged at the SJB fuse box using 12v Car Add-a-Circuit Fuse Tap Adapter Mini ATM APM Blade Fuse Holders. I found two suitable unused circuits.
o Ground to an existing lug to minimize unnecessary new holes
o Grommet expander and WD40 will help pass connectors through existing grommet
o To pass harness into crush rail, a hole large enough to pass the camera connectors needs to be drilled and deburred
• Use a suitable grommet to prevent chaffing
o Camera harness should be sheathed in a heat shield as it passes through the engine bay. Used Thermo-Tec Thermo-Flex Aluminum Heat Shield in proximity to the headers and exhaust (Aircraft Spruce sells it by the 10' length) in addition to wrapping the entire run in flame retardant XPF expandable sleeving.
• Camera Mounting Notes
o Bracket design was performed with system running to optimize camera Field Of View
• 2024 Aluminum utilized
o Camera set back as far as possible from bumper to where the bumper just goes out of view when properly positioned
• Camera pointing angle set parallel to ground plane
• Fine adjust to preference
o Designed with desire to keep camera as inconspicuous as possible
We looked at various mounting possibilities and decided to go for the passenger side, above the diffuser. He crafted a custom bracket out of 2024 aluminum for the bullet camera.
• Installation summary (Front to Rear)
o Mirror/display installed onto stock rear view mirror bracket
o Wiring run above headliner, down the right A-pillar, constant/switched/ground/camera ground/reverse connected in passenger footwell, camera harness with power and ground wires (twisted pair) tucked under the right scuff plate, up the right B-pillar, through the existing grommet behind the right seatbelt retractor, downward to the frame rail and back to the rear following existing harness routing and into the right rear bumper crush rail
o Camera attached to right rear bumper crush rail (frame extension) with custom aluminum bracket
• Vehicle Prep
o Lower windows and unlock vehicle
o Disconnect battery
• Let car sit for fifteen minutes to bleed off any residual energy
o Remove door seals
• Right side full
• Left side partial (just to remove headliner)
o Remove headliner
• Remove sun visors (4 screws) and hood release (3 screws)
• Remove rear headliner (removal required to release the front one)
• Remove front headliner
o Remove A-pillar trim panel
o Cowl side trim panel left in place (Scuff plate restricts removal)
o Remove B-pillar upper trim panel
o B-pillar lower trim panel left in place (Scuff plate restricts removal)
o Scuff plate removal would facilitate finding the reverse wire, but the attachment screws are underneath the scuff plate insert and its removal pretty much destroys the insert. Chose not to destroy the scuff plate and accessed the reverse wire on the back side of the Smart Junction Box. Alternately, you can run an additional wire all the way to the rear backup light harness, but it’s not as clean an install with the extra wire running the length of the car. Looked for an easier to access harness bundle with the reverse wire, but gave up after searching for a few hours. Harness runs under scuff plate and through the frame itself…
o Disconnect safety belt pretensioner electrical connector
o Loosen oil reservoir as it will need to be pushed aside to access pass through grommet
o Raise right rear of vehicle and remove the right rear wheel. Harness routing is directly behind the wheel on the inner side of the frame rail.
o Remove the right wheel opening cover (horizontal cover behind wheel) to access crush rail
• Smart Junction Box (SJB) Access
o Wear an ESD strap as some of the modules are ESD sensitive
o Remove SJB cover
o Remove SJB bracket bolts
o Remove Inertial Fuel Switch mounting bolts to free up vehicle wiring harness
o Disconnect bulkhead connector
o Coerce SJB out to enable disconnection of rear electrical connectors
o Smart Junction Box circuit identification for reverse
• For Positive Trigger
• CKT 140 (BK/PK) is the positive trigger (goes to >10V when brake depressed)
o This is the positive voltage output to the reversing lamp
• For Negative trigger (Not common)
• CKT 1789 (VT/WH) is the negative trigger (goes to ground when brake depressed)
o This is the relay signal coming from the reversing lamp switch
• Harness
o Good practice to ground the camera ground at the same location as the mirror/display ground to prevent any chance of having to run the extra wire after determining you have a ground loop issue
o Twist the camera power and ground lines if not already using a twisted pair. Twisted shielded is even better.
o Constant and switched power can easily be tagged at the SJB fuse box using 12v Car Add-a-Circuit Fuse Tap Adapter Mini ATM APM Blade Fuse Holders. I found two suitable unused circuits.
o Ground to an existing lug to minimize unnecessary new holes
o Grommet expander and WD40 will help pass connectors through existing grommet
o To pass harness into crush rail, a hole large enough to pass the camera connectors needs to be drilled and deburred
• Use a suitable grommet to prevent chaffing
o Camera harness should be sheathed in a heat shield as it passes through the engine bay. Used Thermo-Tec Thermo-Flex Aluminum Heat Shield in proximity to the headers and exhaust (Aircraft Spruce sells it by the 10' length) in addition to wrapping the entire run in flame retardant XPF expandable sleeving.
• Camera Mounting Notes
o Bracket design was performed with system running to optimize camera Field Of View
• 2024 Aluminum utilized
o Camera set back as far as possible from bumper to where the bumper just goes out of view when properly positioned
• Camera pointing angle set parallel to ground plane
• Fine adjust to preference
o Designed with desire to keep camera as inconspicuous as possible