
Technical / Detail Photos
- Thread starter Team Jeff
- Start date
You are using an out of date browser. It may not display this or other websites correctly.
You should upgrade or use an alternative browser.
You should upgrade or use an alternative browser.
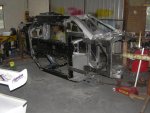
Interesting - having restored 2 BOSS Mustang's, I would have killed to get assembly line details like this. In 20 or 30 years when folks are starting to restore these things, they will be very glad and lucky someone took the time to document the assembly process with pictures. Someone needs to start generating a book on the subject now. Ed
Thugboat
GT Owner
Thugboat
GT Owner
Pieces of the blades from the Supercharger! The blades made contact when bearings failed. Will give more details later.
Larry
Larry
Thugboat
GT Owner
Silverbullitt
GT Owner
Best thread ever!!!!!
My largest regret from rally I was not getting all of the folks videotaping together and place one at each assembly station for the 45 minute shift. We would have seen the complete assembly at Saleen. DOH!!!!!
My largest regret from rally I was not getting all of the folks videotaping together and place one at each assembly station for the 45 minute shift. We would have seen the complete assembly at Saleen. DOH!!!!!
Last edited:
Neilda
GT Owner
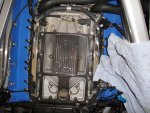
I'm always amazed how HUGE our engines are! Whilst they don't look entirely 'innocent' in the car, you don't quite appreciate just how big they are! Great pics.... :cheers
ultrasportracing
GT Owner
ultrasportracing
GT Owner
NorthwoodGT
GT Owner
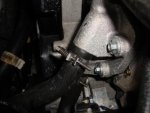
incredible detailed pictures! extremely usefull when assembling a car from scratch as I am doing. finally see where the bracket goes on the alternator to hold up the 2 hoses. great shot.
would you happen to have a picture of where the fuel shut off switch mounts under the dash? for the life of me I can'e see where it goes. had several cars in the past but never paid any attention
to the fuel shut off. thanks in advance.
would you happen to have a picture of where the fuel shut off switch mounts under the dash? for the life of me I can'e see where it goes. had several cars in the past but never paid any attention
to the fuel shut off. thanks in advance.