Removing wheel covers on standard wheels


Spirit's Son

GT Owner
Jan 17, 2007
165
Bulverde, TX
Hey guys,
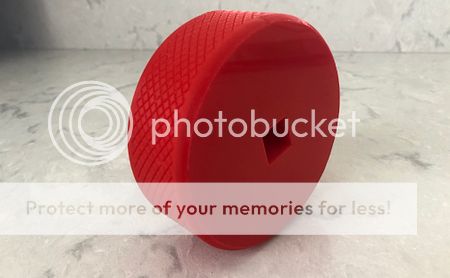
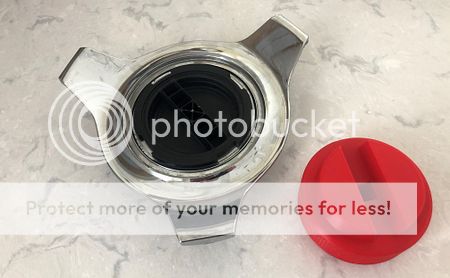
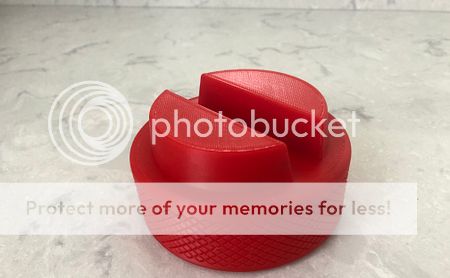
Sorry for feeling like a dingbat here, but I can’t seem to safely get the lug nut/wheel covers off the 06. It’s got a flat that I need to go get fixed.

The silver plastic cover rotates about 1/4 turn, but I cannot find a way to get it off safely. And if the whole “knock off” piece needs to come off, that I too can’t budge safely.

Please tell me the obvious thing I am missing

55610
 
what kind of wheels are those? just kidding... if memory serves me the middle of the wheel is threaded you have spin the middle flat part counterclockwise to get the spinners off.
 
the GT center cap rotates into slots. push in gently and rotate counter clockwise. sometimes you might want to use a rubber glove to get the cap to rotate enough to line up with the slots. once off, there is a black bar in the center of the winged cap. turn it counter clockwise as well to unscrew from the center of the wheel hub which is threaded. hope that helps
 
I put the palm of my hand on that silver center cap and push it in before rotating it counter clockwise. That center cap is sort of spring loaded and there are stops that keep it from turning far enough to come off. Pushing it in allows it to be turned past those stops, kind of like a child proof cap on a pill bottle. Hope that helps.

Chip
 
  • Like
Reactions: roketman
Yup, the silver center of the cap unscrews but it has to be very clean and your hands do to or use rubber gloves as Northwood said because your finger tips or palm of your hand need to stick to the smooth silver center cap to press in and rotate several turns beyond the 1/4 turn you are getting it to now. Don't be afraid to use some force. Cars with miles and driven in weather seem to need a little convincing to come off. You can't break it. I get it off in 1 piece this way. Let us know if you are successful. Nice wheels BTW.
 
Last edited:
I found this in the archives...

Xcentric
GT Owner

Mark II Lifetime
Jul 8, 20125,084Myakka City, Florida
Sep 2, 2012

Sep 2, 2012The FSM calls the spinner an "escutcheon."

Removal and Installation:

Remove the center cap in three stages:
Stage 1: Rotate the escutcheon counterclockwise to the stop.
Stage 2: Push and rotate the escutcheon counterclockwise to the second stop and remove.
Stage 3: Rotate the center cap insert counterclockwise.

Install the center cap insert on the wheel by rotating it clockwise. To install the escutcheon, push and rotate it clockwise to the stop
 
A you tube video would be great
 
Geezus. You just press and unscrew. Like an adult proof prescription bottle. Sometimes the whole thing unscrews with the center piece. Sometimes the center piece comes off (like it's supposed to) and then you unscrew the black plastic thing under the center piece.

When you put it back together, use a tiny bit of grease on the threads of the black piece. Otherwise it may get too tight to loosen by hand the next time. Don't use vaseline! Ask me how I know. And just tighten the black piece until it's snug (i.e., when the spinner no longer wobbles).
 
When you put it back together, use a tiny bit of grease on the threads of the black piece. Otherwise it may get too tight to loosen by hand the next time. Don't use vaseline! Ask me how I know.

Ok I’ll bite. How do you know? I’ve been using Vaseline on those spinners and so far it’s worked pretty good. What am I screwing up??

Chip
 
I guess I went with the if a little bit is good, more must be better philosophy. Centrifugal force flinging hot liquified vaseline everywhere. :LOL:
 
I found that wearing some rubber gloves really helps with grip when you are trying to turn the hub. YRMV
 
I keep a flat round rubber gripper for opening stubborn jar lids in the car. It will fit just about anywhere.
 
@Sinovac is too modest to post this removal tool for stuck caps that he manufactured.

20190528_124901.jpg20190528_124912.jpg
 
Last edited:
Got bored on Tuesday (winters in Ohio, sigh...) and designed/3d printed a removal tool... included a square hole in the center for a 1/2" socket wrench extension in case the nut needed a little "persuasion".

Sorry about the photobucket watermark... only way I can post photos is with a http link.

Dan
IMG_1319.JPG
IMG_1320.JPG


IMG_1318.JPG
 
Last edited:
^^^ I miss Xcentric.
 
^^^ I miss Xcentric.
I could not agree more he was one of a kind and his posts were very informative or entertaining depending on the subject.
 
Me too Howard. I think of him often and imagine the political conversations we’d be having today.
 
Got bored on Tuesday (winters in Ohio, sigh...) and designed/3d printed a removal tool... included a square hole in the center for a 1/2" socket wrench extension in case the nut needed a little "persuasion".

Sorry about the photobucket watermark... only way I can post photos is with a http link.

Dan
IMG_1319.JPG
IMG_1320.JPG


IMG_1318.JPG

Nice job Dan. Those are much more professional than my quarter sawn oak tool. Lol
 
Actually, I was just getting ready to saw some blocks like your tool and then thought it would be a good project for the 3D printer... 9 hours of print time, ugh.

I printed off 5 parts and am keeping 1 for myself... if anyone wants one please PM me. The filament was already paid for from a previous project so there won't be any cost. **** Update - all the parts are now spoken for, hopefully get some feedback on them and then incorporate the improvements for another run ****

Here is a stupid little video from my youtube channel I shot showing (I hope) how to remove the cap and spinner.

Dan

 
Last edited:
  • Like
Reactions: jammer and extrap
Here is a stupid little video from my youtube channel
Hardly stupid, Dan. I think that's great. Super job!