
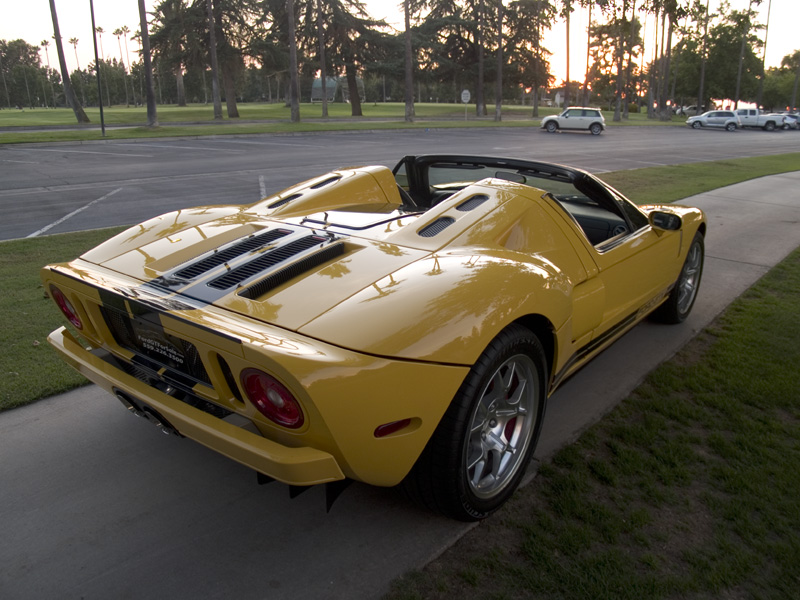
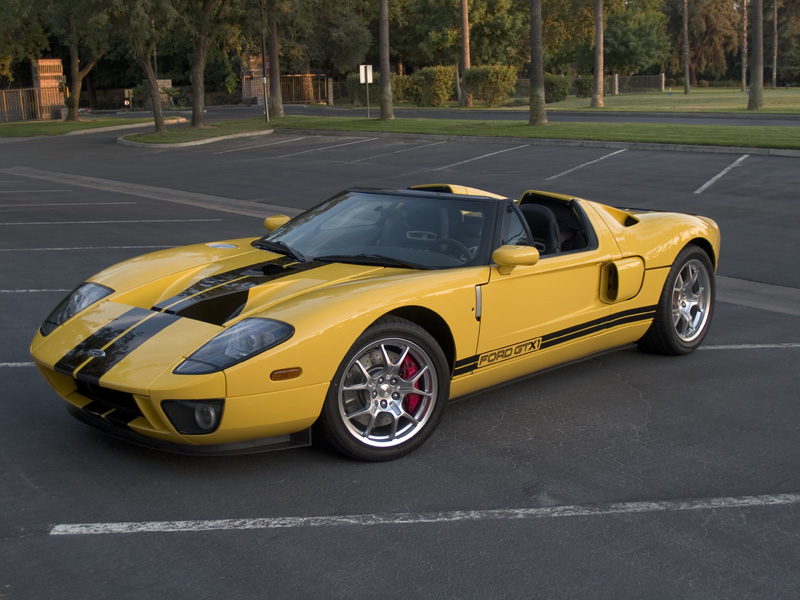
Finally our GTX1 Whipple install is finished and I am able to share some of the photos and information on what it took to complete this project. We were called upon by Marv Rose (fordgtforsale.com) to install a 3.3L Whipple along with other accompanying parts and a X-Pipe earlier this spring for one of their clients that owns another GT that we had previously modded. Initially, I thought this was not going to be a big deal given the fact that I had seen at least two other GTX1’s with Whipples on them; however, after doing some investigation, I found out that those two cars had revised hatches that were installed at the factory late in production to accommodate the taller supercharger. So after developing a plan on what I suspected that had to be done and discussing my ideas with the owner we decided to move forward.
The first order of business was to mock up the supercharger and make some observations about what needed to be changed to allow the kit to physically fit and the hatch to close. We quickly discovered the obvious; with the supercharger installed we lacked a minimum of 9/16” clearance just to shut the hatch. Secondly, once the Plexiglas window was removed the next issue to over come was an interference between the aluminum hood brace and the front drive plate and pulley on the supercharger; I also noted that the clearance between the drive pulley and the underside of the panel was extremely tight and would require some ingenuity to not only clear at idle but more importantly, keep the pulley from touching under acceleration. So with some notes, ideas, and input from my team, we moved forward. Now, I had noted in photos that on the factory install the hood brace had been severely notched to clear the drive plate but I felt certain we could accomplish the same end result but without compromising the structural integrity of the brace and maintain a cleaner look by simply moving the drive plate back. We then removed the plate entirely to check pulley to brace clearance and set about carefully massaging the brace with the hood on the car making sure to cover everything completely and just removing small amounts of material at a time until we had just enough clearance to clear the pulley; we then additionally machined the pulley specifically on the backside for a slight amount more clearance and we also turned the belt guards down slightly to give us a slight bit more room to the underside of the top panel.
With the hatch now able to close, we moved on to engineering a custom front idler plate to clear the hatch brace. We moved the plate back enough to comfortably clear the brace with new mounting points and moved the sliding idler back inline with the drive. Now we could actually start the engine but then we quickly discovered that we needed to look closer at belt alignment; with the belt guards lowered on the pulley, the belt was moving forward off the pulley….could this be the source of the dreaded “pulley chirp”? I think so.
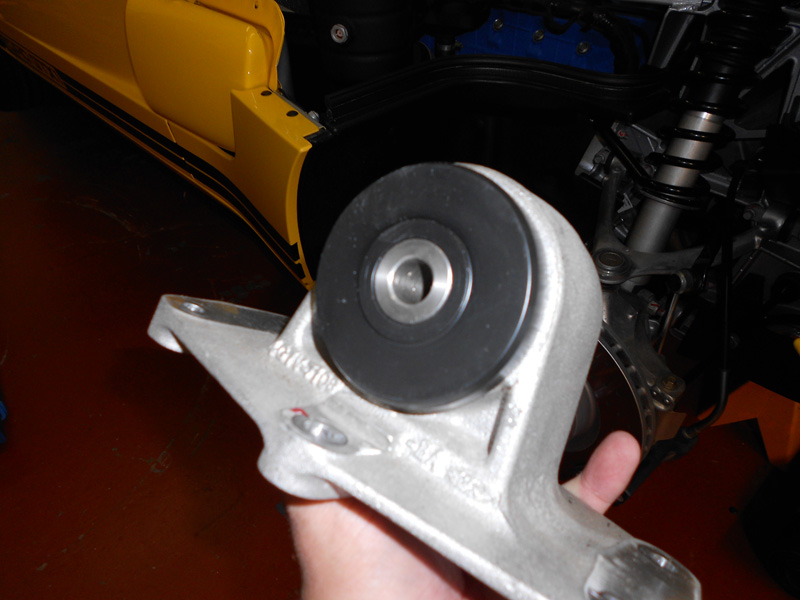
After some investigation and engineering help with the R&D staff at Whipple, we were able to correct our belt alignment problems and move on to the next hurdle. Through observation on other GT’s, we knew that the engine rises at the front approximately 3/4” under hard acceleration due to the forces at work; when torque is applied, the transaxle will tend to push itself downwards toward the ground, pivoting on the motor mounts and rocking upward in the front. Our solution here was to machine a custom transaxle bushing with a selected Delrin material that would provide a much more stable mounting point but with just enough “give” to keep from transmitting vibration into the drivers’ compartment. We took the necessary dimensions and built a custom bushing with a stainless sleeve and installed it in to the OE mounting plate and reinstalled it back into the car.
With the new bushing in place and the exhaust and other components installed it was time to drive the car…everything worked together beautifully and now we were ready to take the final step…addressing the hatch window.
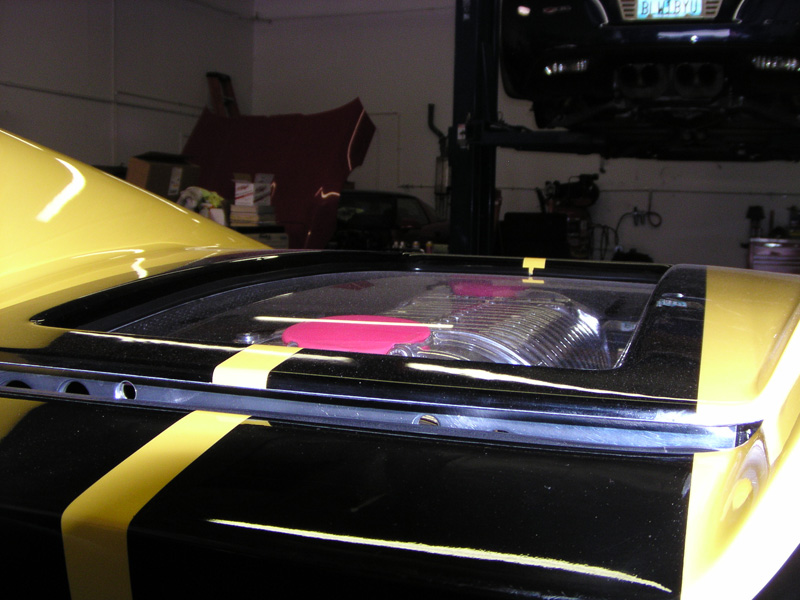
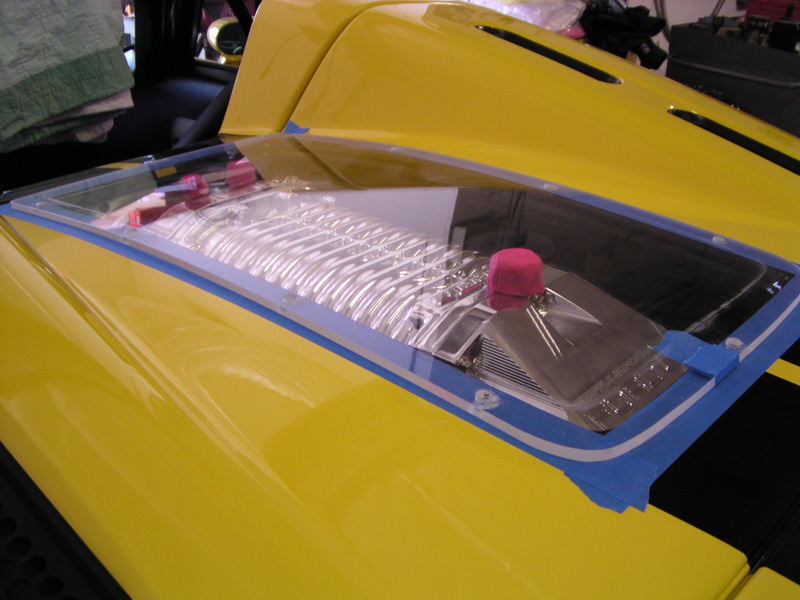
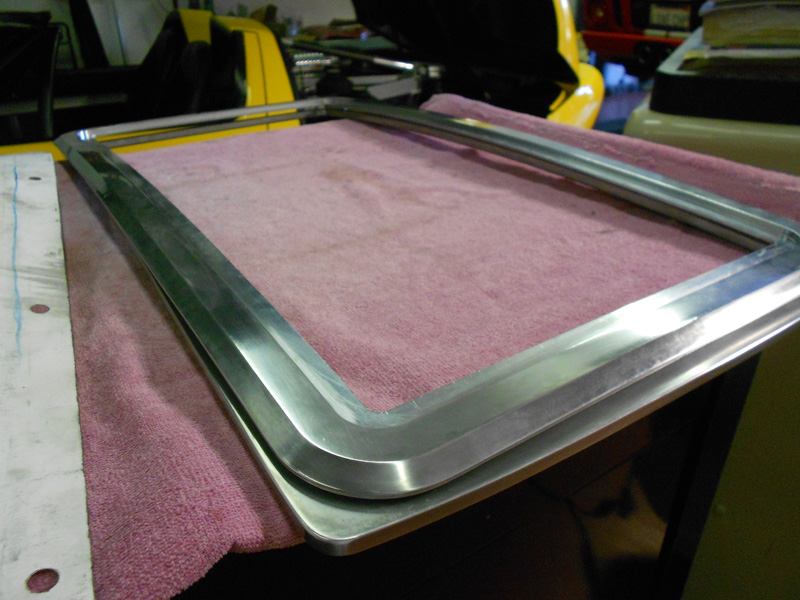
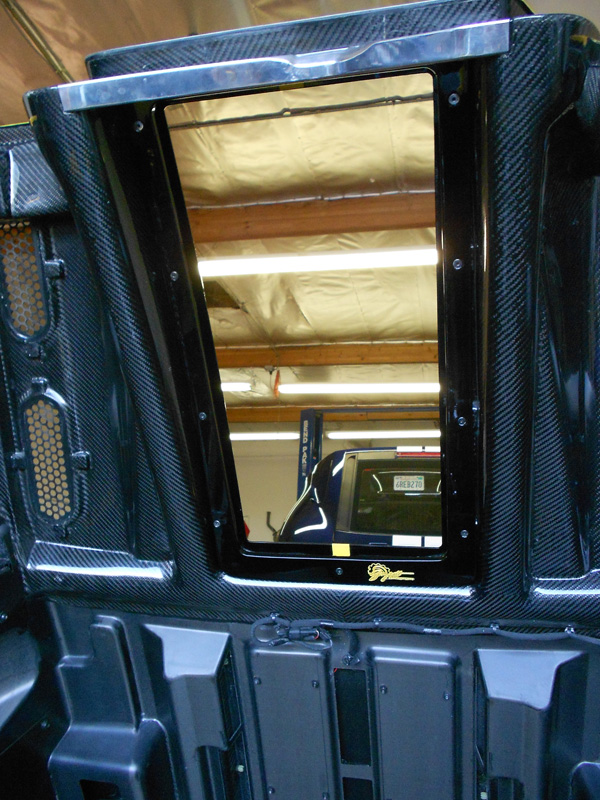
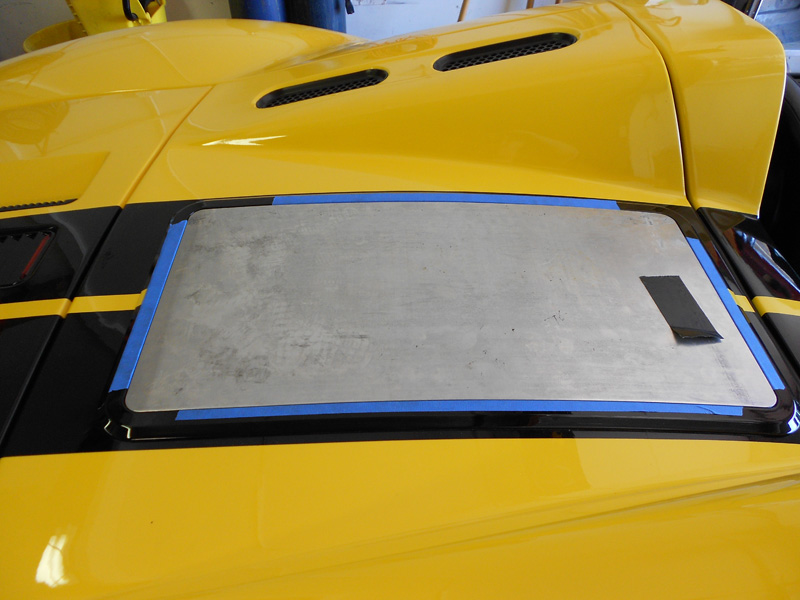
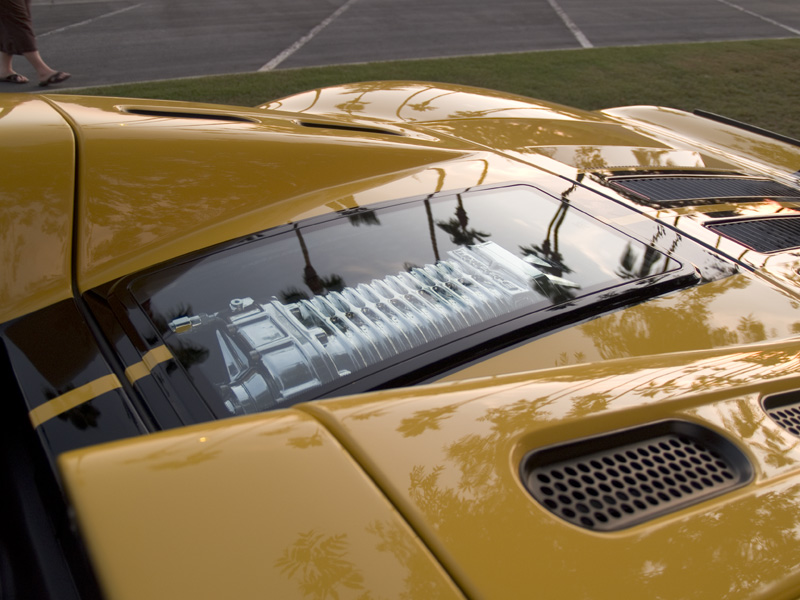
During the build process, I had been working on some ideas with my resident CNC guru Abel and we had thrown around a number of ideas and made sample cross sections of the part that would later become the top window frame. Right from the start, my intentions were to make a proper frame with a true DOT legal automotive tempered window; I did not like the Plexiglas panel, attached with push-in trim fasteners on this caliber of an automobile. I felt that we had to hold ourselves to a higher standard on this build. As I consulted with a glass shop that specializes in custom glass for customs and hot rods, I was given some specific dimensions to build our frame around (this would later prove to be a challenge). After arriving on a contour that was complementary to car and would meet my design criteria and “look like it came from the factory”; In CAD, we designed a two-piece frame assembly that mounted to the topside of the hatch in a completely smooth fashion with no exposed fasteners and a bottom panel that held it in place with locating dowels and stainless hardware. We took careful measurements and matched the profile of both of the top and bottom of the hatch, the factory trim channel and front brace clearances along other critical dimensions. Fixtures were made and we went to work “making chips”. With the panels done, we carefully fitted them to the hatch, making some small adjustments along way. Before long they were bolted on and looking right at home. Next, we removed them and sent them along with the car to our expert painter where he matched the colors and painted both panels and lined up the stripes on both sides of the top frame.
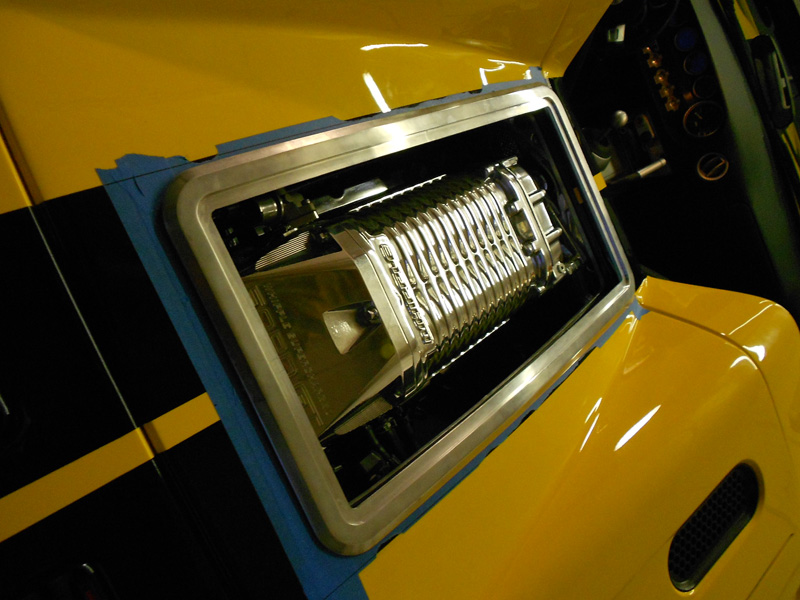
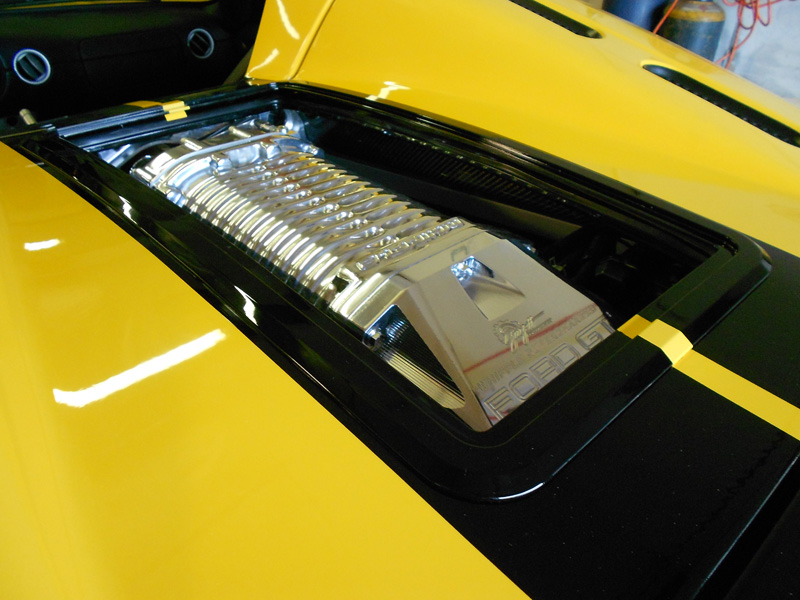
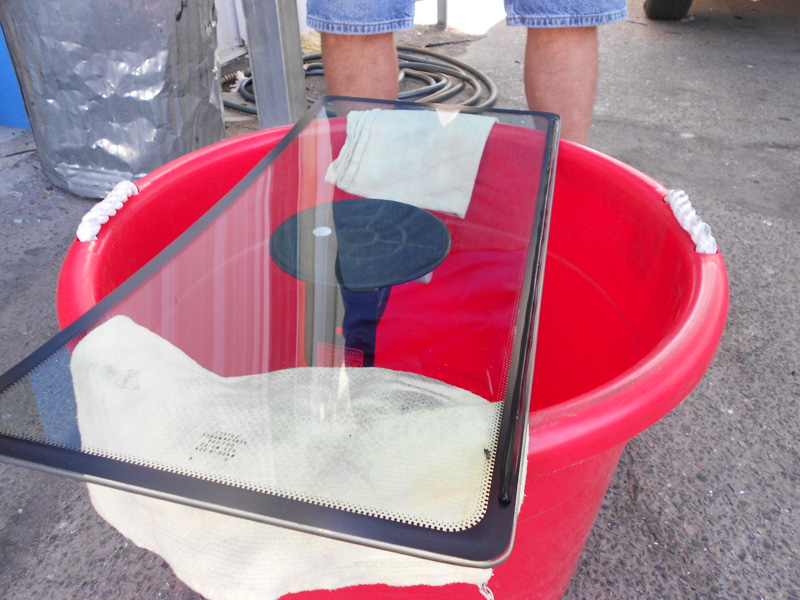
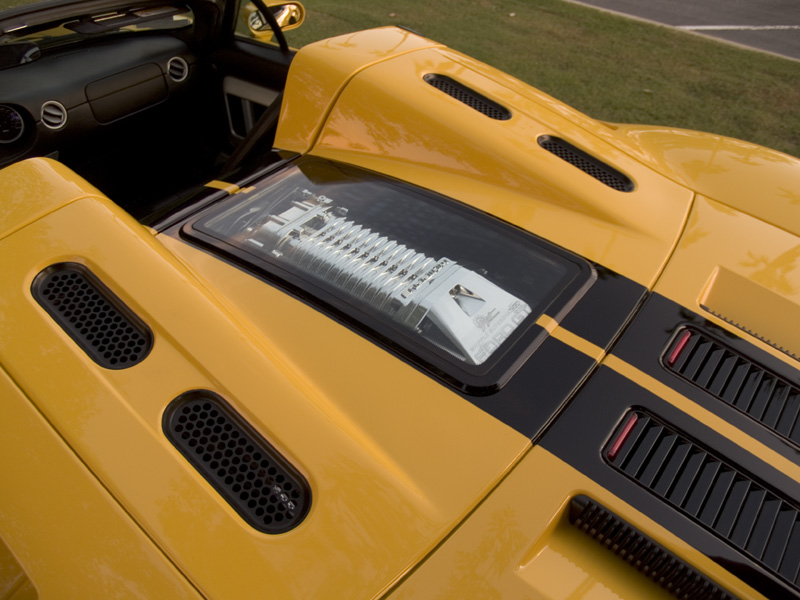
Next came the glass, which I thought was not going to be an issue but after seeing the radius on the finished frame I became skeptical of what I had been told in the beginning; that a flat piece of tempered glass could be “bent” into the frame with that much radius. My suspicions were confirmed the day that I showed up to have the glass installed only to be told by the glass installer the only way to bend it into the frame would require another frame to hold it in place….no way! After a solid week of researching options, I found a company that specializes in manufacturing tempered glass for Detroit concept cars and low production vehicles; the rep was a great help and put my mind at ease about what was able to be done and keep my vision intact. We went back to the CNC and milled out an exact template of the glass panel and sent it to the manufacturer to be produced for us. The glass manufacturer went a couple steps further for us by matching the OEM glass tint formulation and making a correct outside perimeter ceramic dot matrix pattern matching the other Ford OEM glass in the car. After 6 weeks or so of anticipation, the panel showed up and it was an exact fit to our frame. We then installed it in the frame, floating it in a true OE fashion. The end result was a long time coming but I think well worth the effort on behalf of everyone involved, I could not be happier and the owner is now very pleased and thoroughly enjoying his custom GXT1.
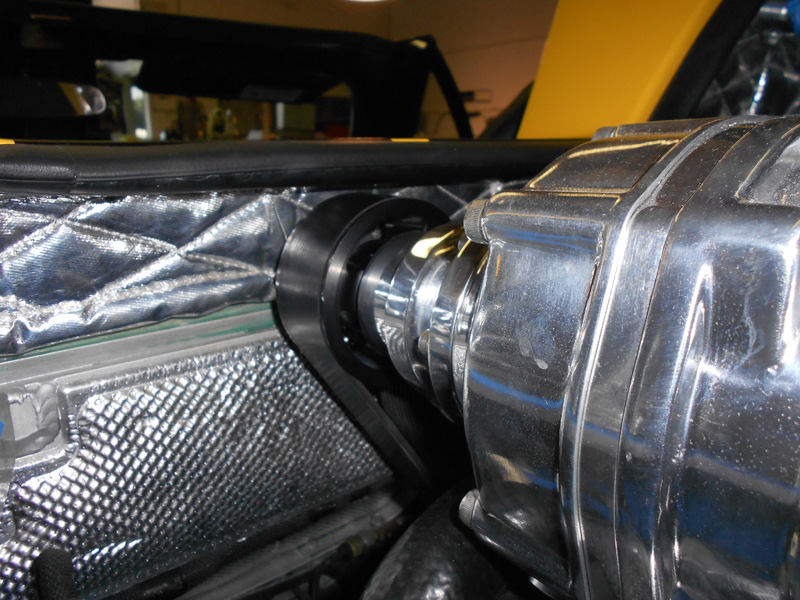

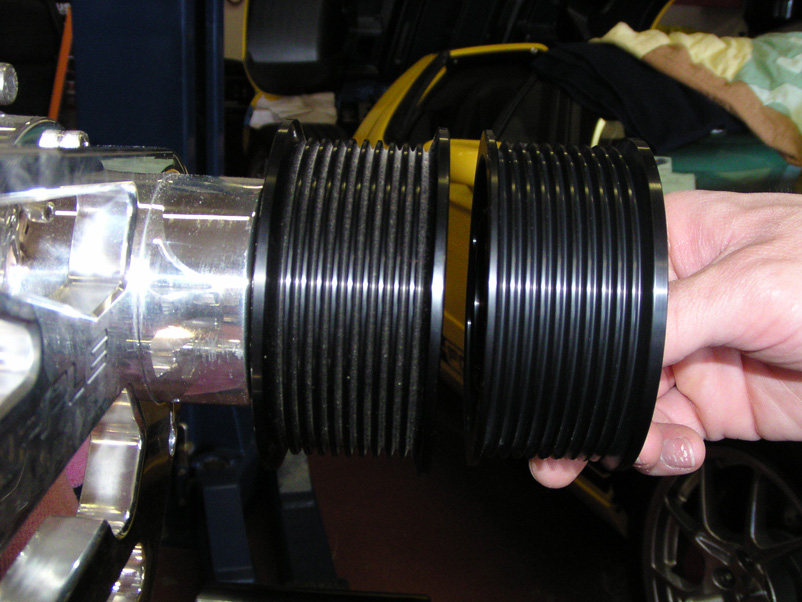

The first order of business was to mock up the supercharger and make some observations about what needed to be changed to allow the kit to physically fit and the hatch to close. We quickly discovered the obvious; with the supercharger installed we lacked a minimum of 9/16” clearance just to shut the hatch. Secondly, once the Plexiglas window was removed the next issue to over come was an interference between the aluminum hood brace and the front drive plate and pulley on the supercharger; I also noted that the clearance between the drive pulley and the underside of the panel was extremely tight and would require some ingenuity to not only clear at idle but more importantly, keep the pulley from touching under acceleration. So with some notes, ideas, and input from my team, we moved forward. Now, I had noted in photos that on the factory install the hood brace had been severely notched to clear the drive plate but I felt certain we could accomplish the same end result but without compromising the structural integrity of the brace and maintain a cleaner look by simply moving the drive plate back. We then removed the plate entirely to check pulley to brace clearance and set about carefully massaging the brace with the hood on the car making sure to cover everything completely and just removing small amounts of material at a time until we had just enough clearance to clear the pulley; we then additionally machined the pulley specifically on the backside for a slight amount more clearance and we also turned the belt guards down slightly to give us a slight bit more room to the underside of the top panel.
With the hatch now able to close, we moved on to engineering a custom front idler plate to clear the hatch brace. We moved the plate back enough to comfortably clear the brace with new mounting points and moved the sliding idler back inline with the drive. Now we could actually start the engine but then we quickly discovered that we needed to look closer at belt alignment; with the belt guards lowered on the pulley, the belt was moving forward off the pulley….could this be the source of the dreaded “pulley chirp”? I think so.
After some investigation and engineering help with the R&D staff at Whipple, we were able to correct our belt alignment problems and move on to the next hurdle. Through observation on other GT’s, we knew that the engine rises at the front approximately 3/4” under hard acceleration due to the forces at work; when torque is applied, the transaxle will tend to push itself downwards toward the ground, pivoting on the motor mounts and rocking upward in the front. Our solution here was to machine a custom transaxle bushing with a selected Delrin material that would provide a much more stable mounting point but with just enough “give” to keep from transmitting vibration into the drivers’ compartment. We took the necessary dimensions and built a custom bushing with a stainless sleeve and installed it in to the OE mounting plate and reinstalled it back into the car.
With the new bushing in place and the exhaust and other components installed it was time to drive the car…everything worked together beautifully and now we were ready to take the final step…addressing the hatch window.
During the build process, I had been working on some ideas with my resident CNC guru Abel and we had thrown around a number of ideas and made sample cross sections of the part that would later become the top window frame. Right from the start, my intentions were to make a proper frame with a true DOT legal automotive tempered window; I did not like the Plexiglas panel, attached with push-in trim fasteners on this caliber of an automobile. I felt that we had to hold ourselves to a higher standard on this build. As I consulted with a glass shop that specializes in custom glass for customs and hot rods, I was given some specific dimensions to build our frame around (this would later prove to be a challenge). After arriving on a contour that was complementary to car and would meet my design criteria and “look like it came from the factory”; In CAD, we designed a two-piece frame assembly that mounted to the topside of the hatch in a completely smooth fashion with no exposed fasteners and a bottom panel that held it in place with locating dowels and stainless hardware. We took careful measurements and matched the profile of both of the top and bottom of the hatch, the factory trim channel and front brace clearances along other critical dimensions. Fixtures were made and we went to work “making chips”. With the panels done, we carefully fitted them to the hatch, making some small adjustments along way. Before long they were bolted on and looking right at home. Next, we removed them and sent them along with the car to our expert painter where he matched the colors and painted both panels and lined up the stripes on both sides of the top frame.
Next came the glass, which I thought was not going to be an issue but after seeing the radius on the finished frame I became skeptical of what I had been told in the beginning; that a flat piece of tempered glass could be “bent” into the frame with that much radius. My suspicions were confirmed the day that I showed up to have the glass installed only to be told by the glass installer the only way to bend it into the frame would require another frame to hold it in place….no way! After a solid week of researching options, I found a company that specializes in manufacturing tempered glass for Detroit concept cars and low production vehicles; the rep was a great help and put my mind at ease about what was able to be done and keep my vision intact. We went back to the CNC and milled out an exact template of the glass panel and sent it to the manufacturer to be produced for us. The glass manufacturer went a couple steps further for us by matching the OEM glass tint formulation and making a correct outside perimeter ceramic dot matrix pattern matching the other Ford OEM glass in the car. After 6 weeks or so of anticipation, the panel showed up and it was an exact fit to our frame. We then installed it in the frame, floating it in a true OE fashion. The end result was a long time coming but I think well worth the effort on behalf of everyone involved, I could not be happier and the owner is now very pleased and thoroughly enjoying his custom GXT1.
Last edited: