Audio System and Head Unit Photos


ENZO BTR

GT Owner
Mark IV Lifetime
Sep 11, 2005
1,048
Southern California
Hey Guys,

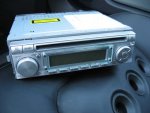
I finally broke down and had someone help me pull my car's head unit. I had a base unit (NO MAC) and while it got the job done for basic music needs I was looking for something more -- something at the very least capable of playing MP3s, and likely more.

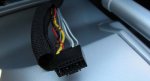
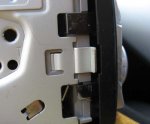
I tried removing the unit myself after reading some of the various threads here, but I couldn't get it out and was starting to really scratch the side of the factory head unit. I'd even ordered the "removal tool" kit (part number 415-003), but that proved worthless. Maybe it works with the MAC unit...

So yesterday I drove over to the local Best Buy thinking I'd give them a chance. Long-story-short, they had it out in about 10 minutes with no damage to any of the surrounding surfaces (or the head unit or trim piece). All the guys in the audio bay were, of course, quite smitten with the car. I ended up not buying anything from that store, but threw the guy who did the removal a $20 (after much insistance from him that it wasn't necessary).

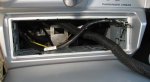
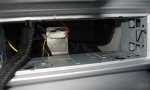
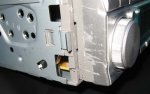
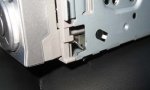
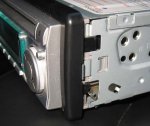
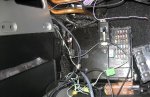
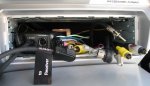
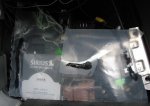
I've taken a bunch of photos because I know these would have really helped me in my removal efforts. Hopefully they can help someone else looking to do the same thing. There's a crazy new JVC unit that has a DVD player, nav system and full audio support (MP3s, CD-Rs, DVD-Audio, Sirius, etc.) that just came out. It offers all of these things in a single DIN size, so it should fit in this area no problem. I'll let you know if/when I get it (and I'll take pictures).

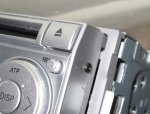
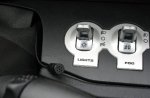
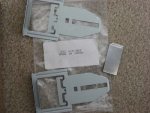
This audio removal tool was no help.
 

Attachments

  • audio removal took kit EE.jpg
    audio removal took kit EE.jpg
    48.4 KB · Views: 1,310
Last edited:

ENZO BTR

GT Owner
Mark IV Lifetime
Sep 11, 2005
1,048
Southern California
Here's a shot of the head unit and the open DIN area after it was out. The guys at Best Buy said I would likely have to pull that upright metal support behind the head unit to put in a larger model, but the two mounting nuts are easily accessed (they are just below the lower lip of the DIN, so you can't see them in these shots but removing them would be easy. Also a shot of the car's audio plug that my new unit will have to splice into.
 

Attachments

  • Ford GT head unit E.jpg
    Ford GT head unit E.jpg
    45.2 KB · Views: 1,301
  • Ford GT DIN E.jpg
    Ford GT DIN E.jpg
    41.2 KB · Views: 1,301
  • Ford GT DIN close up E.jpg
    Ford GT DIN close up E.jpg
    39 KB · Views: 1,301
  • Ford GT audio plug E.jpg
    Ford GT audio plug E.jpg
    31.9 KB · Views: 1,289
Last edited:

ENZO BTR

GT Owner
Mark IV Lifetime
Sep 11, 2005
1,048
Southern California
Here are some close-up shots of the head unit's release latches. I thought they were much further back based on the diagrams in the owner's manual .pdf that someone else posted on this forum, but they are RIGHT BEHIND the black trim piece. I've also included a shot of the screw that keeps the faceplate from being removable. You could theoretically remove this screw and be able to take the faceplate off (if you wanted to for some reason...) Yes, I'm the one who scratched up the side of the head unit (DOH!)
 

Attachments

  • Ford GT head unit release A E.jpg
    Ford GT head unit release A E.jpg
    42.7 KB · Views: 1,292
  • Ford GT head unit release B E.jpg
    Ford GT head unit release B E.jpg
    35.8 KB · Views: 1,280
  • Ford GT head unit trim A E.jpg
    Ford GT head unit trim A E.jpg
    49.3 KB · Views: 1,277
  • Ford GT head unit trim B E.jpg
    Ford GT head unit trim B E.jpg
    39.6 KB · Views: 1,274
  • Ford GT head unit faceplate screw E.jpg
    Ford GT head unit faceplate screw E.jpg
    51.9 KB · Views: 1,269

ENZO BTR

GT Owner
Mark IV Lifetime
Sep 11, 2005
1,048
Southern California
And here are some shots of the top of the head unit and the back of the head unit.
 

Attachments

  • Ford GT head unit top E.jpg
    Ford GT head unit top E.jpg
    51.6 KB · Views: 1,266
  • Ford GT head unit back E.jpg
    Ford GT head unit back E.jpg
    45.6 KB · Views: 1,258

MAD IN NC

Proud Owner/ BOD blah bla
Mark IV Lifetime
Feb 14, 2006
4,211
North Carolina
Karl, I also fought the same dilema - first wo/ the Ford tools and bascially ended up slicing my fingers off:lol The Macintosh was built by Clarion - right? Clarion tools could be used - right? - wrong!

When I did get the Ford tools it took all of 5 minutes to get the Mac head unit out. The tool compresses the capture spring of the mounting case. While they might have been made for the GT and Mac - they had to use the same capture springs for your non- Mac head end.

But CONGRATS! looks like you are well on the way to "upgrade" and looking forward to pictures of the new unit you choose.
 
Aug 25, 2006
4,436
Wonderful!!

Thank you for taking the time to share the project and the progress.

All the best

Shadowman
 

MAD IN NC

Proud Owner/ BOD blah bla
Mark IV Lifetime
Feb 14, 2006
4,211
North Carolina
Karl - you spurred my interest. Went to the JVC internet site and found the press release of:

JVC Introduces the EXAD-Series KD-NX5000, a 1-DIN HDD-Navigation DVD/CD Receiver with a Built-In 3.5-Inch Wide Monitor

Ironically I've been looking at the Garmin Nuvi 660/670 navigation unit but can't yet find a place to mount it in the GT. This new option might be just as valuable and cost effective in total.

Now all I have to do is find a dealer that carries the head unit to look at it figure it out, break the wirning diagram manual out and figure how to splice into the Mac Amp:lol
 

ENZO BTR

GT Owner
Mark IV Lifetime
Sep 11, 2005
1,048
Southern California
Yup, that's the one! Not cheap at an MSRP of $1,000, though I've already found them on ebay for $660 from sellers with plenty of good feedback and a reasonable return/exchange policy.

Think I'll be ordering this afternoon...
 

ENZO BTR

GT Owner
Mark IV Lifetime
Sep 11, 2005
1,048
Southern California
Well, it cost me several layers of skin and (sadly) a few scuffs to the interior of my GT, but the new JVC KD NX5000 head unit is in my baby now.

First let me say that this was NOT an easy installation. The physical elements were actually quite easy. After the Best Buy guys took out the factory head unit the rest of the physical removal/replacement process was easy. And hooking up the basic elements of the new head unit (ground, power, ignition and speakers) was also a breeze. If I just wanted to benefit from the new unit's basic music functions (which are far from basic, really) I could have completed the process in about two hours.

But NOOOOOO! I had to buy a portable home entertainment system. And that means hooking up all sorts of items that don't normally need to be dealt with (speed signal, reverse lights, parking brake, etc., etc.) With that said, the job is almost done and the results are pretty stunning. First, here's a picture of the final product.
 

Attachments

  • Ford GT Audio Head Unit Installed E.JPG
    Ford GT Audio Head Unit Installed E.JPG
    33.9 KB · Views: 1,157
Last edited:

ENZO BTR

GT Owner
Mark IV Lifetime
Sep 11, 2005
1,048
Southern California
Here's a shot of the passenger floorboard area where I was pulling the wires around the back of the center console. Dimensions were tight here (they were tight EVERYWHERE in this install), but I didn't have to actually remove the center stack area. Just pulling the eight torx screws from the base of the center stack allowed me enough flex to get the wires pulled from the head unit area, around the back of the center stack, and into either the driver's or passenger's footwell area. There are those two holes/vents in the center stack right next to the head unit on the front side, and they would have been easy to use. But I wanted to keep this installation clean so I took the hard route. It was worth it (barely).

You have to be careful on routing the wires in the passenger footwell because those brown pipes run the heating system -- and they get HOT!!
 

Attachments

  • Ford GT Audio Pass. Floor Wires E.JPG
    Ford GT Audio Pass. Floor Wires E.JPG
    51.9 KB · Views: 1,162
Last edited:

BlackICE

GT Owner
Nov 2, 2005
1,416
SF Bay Area in California
Looks great, where did you mount the GPS antenae?
 

ENZO BTR

GT Owner
Mark IV Lifetime
Sep 11, 2005
1,048
Southern California
This head unit can do so many things that, if you want to take advantage of them all, you have to run LOTS of connections. Here's a look at all the things coming out of the back of the head unit just before I did the final installation.

From left to right they are:
1. Bluetooth auxiliary unit (sold separately) with mic wire and another wire to hook to the other major add-on component (Sirius satellite radio)
2. Head unit plug, which was the basic plug for power, ground, accessory and speakers
3. Video input plug (allows for rear camera hookup or any other video source to play through unit)
4. Speed signal wire, which is necessary to make the navigation system work
5. Reverse signal wire, which is necessary to make the reverse camera work
6. Other end of Bluetooth plug that carries signal from Sirius satellite receiver
7. GPS antenna plug to allow navigation system to work and track car's location
8. Video out plug that allows an external monitor to also display whatever DVD is playing in unit
9. Digital optical cable to carry audio signal of whatever DVD is playing in unit to external device
10. Terrestrial radio antenna (floating above the others) that picks up basic AM/FM stations

Whew!
 

Attachments

  • Ford GT Audio Head Unit Connections E.JPG
    Ford GT Audio Head Unit Connections E.JPG
    36.2 KB · Views: 563

ENZO BTR

GT Owner
Mark IV Lifetime
Sep 11, 2005
1,048
Southern California
Here's a shot of the passenger floorboard/fuse box area just before I closed it up. As you can see, I managed to fit the Sirius satellite receiver under it (it was tight -- like every other part of the job). I also hooked the parking brake wire from the head unit into the rear defrost fuse. Worked perfectly!! The unit is not supposed to display video until the car's parking brake is on. Well, with this set-up the unit thinks the brake is on whenever the rear defrost is OFF. So, basically, if I want to watch video I can't also be defrosting the rear window.

I can live with that...

BTW, that plastic cover over the fuse box has patches of a tar-like adhesive to hold it in place, but the stuff gets on EVERYTHING so if you go in here don't say I didn't warn you. This is also where I wrapped all the unused connections like the rear camera and audio/video out. At some point I will try to get a small rear camera (JVC makes one but they aren't available yet) and then I can just pull the fuse cover and plug in. Same for the video/audio out -- if I take a long road trip and the passener wants to have a larger video player on his/her lap they can just plug into the signals coming out of the head unit.
 

Attachments

  • Ford GT Audio Fuse Box E.JPG
    Ford GT Audio Fuse Box E.JPG
    36.6 KB · Views: 566
Last edited:

analogdesigner

GT Owner
Mark IV Lifetime
Nov 15, 2005
949
San Clemente, CA USA
Here's a shot of the passenger floorboard area where I was pulling the wires around the back of the center console. Dimensions were tight here (they were tight EVERYWHERE in this install), but I didn't have to actually remove the center stack area. Just pulling the eight torx screws from the base of the center stack allowed me enough flex to get the wires pulled from the head unit area, around the back of the center stack, and into either the driver's or passenger's footwell area. There are those two holes/vents in the center stack right next to head unit on the front side, and they would have been easy to use. But I wanted to keep this installation clean so I took the hard route. It was worth it (barely).

You have to be careful on routing the wires in the passenger footwell because those brown pipes run the heating system -- and they get HOT!!
Enzo,

With summer (and Al Gore's global warming!) just a few months away, you could use this: http://www.fordgtforum.com/forums/showthread.php?t=1708

Jay
 

ENZO BTR

GT Owner
Mark IV Lifetime
Sep 11, 2005
1,048
Southern California
Here's the Bluetooth mic. This was the easiest part of the install. I just routed it up next to the steering column and then slid it into the crease near the headlight switch. I will add more security if it slips but right now it seems secure enough.

To answer the question about the GPS antenna, I put it on the dash right at the base of the windshield (in the center). The signal is plenty clear enough there with the GT's windshield size and angle. I also put the Sirius antenna in this location. They are both small and hardly noticeable (they certainly don't have ANY affect on your view).
 

Attachments

  • Ford GT Audio Bluetooth Mic E.JPG
    Ford GT Audio Bluetooth Mic E.JPG
    33.8 KB · Views: 564

ENZO BTR

GT Owner
Mark IV Lifetime
Sep 11, 2005
1,048
Southern California
Final thoughts on installation:

This was a major effort that took about 12 hours, though I could have been quicker if I had wanted to be. I still don't have any navigation system because, despite nearly 12 attempts to hook into the GT speed signal the unit acts like it's getting no speed signal, and without it the Nav system is dead. I will keep picking at this issue but I'm frustrated with it. I suspect the problem isn't a lack of signal but some other item. I'm also still trying to get the reverse signal to work. I tried using the reverse lights fuse, but that just gets constant voltage (whether the car is in reverse or not). Routing all the way back to the reverse lights is actually possible with the amount of wire included in that lead, but it would obviously be a major pain.

Everything else works GREAT! Hands-free calling. DVD watching. MP3 playing. Twenty-six gig harddrive for storing music. Sirius satellite radio. It's pretty damn cool.

Yes, there were some minor injuries to the GT's interior after such an endeavor. The metal area on the driver's side of the head unit opening got scratched, and some of that tar-like adhesive got on the passenger seat and dash. I can clean the leather but the scuffs are going to be harder to fix.

But I guess at the end of the day I hated the idea of some stranger tearing into my GT and possibly damaging it more than I hated the idea of tearing into it myself...and possibly damaging it. Hey, at least I saved money and learned more about the car. Don't even think of trying this without the factory wiring manual.

Any thoughts on my speed signal problem are welcome.

Karl
 
Last edited:

ENZO BTR

GT Owner
Mark IV Lifetime
Sep 11, 2005
1,048
Southern California
Jay,

That insulation would have removed the tiny space I had to pull the wires around the back of the center stack.

BUT, now that the wires are pulled it might be a good idea...
 

fjpikul

GT Owner
Mark IV Lifetime
Le Mans 2010 Supporter
Jan 4, 2006
11,503
Belleville, IL
Enzo, isn't there a "reverse" wire at the base of the shifter to tap into when you you actually put the shifter into the gate?
 

ENZO BTR

GT Owner
Mark IV Lifetime
Sep 11, 2005
1,048
Southern California
That sounds reasonable. The parking brake switch is right there, too. But after pulling the rubber boots up on the parking brake and around the shifter it was clear I couldn't tap into anything without pulling the console. That didn't interest me (at least not yet) so I went a different way.
 

DanQ

GT Owner
Aug 18, 2005
336
Lake Zurich, IL
Thanks for posting the pictures. I'll be ordering and installing the same unit shortly.

I surfed the net a bit on this unit. Have you had it up to 30 mph yet? I think there is some "calibration" that takes place at speed. Maybe that is your speed issue?

I feel like you do about someone else working on my GT. Now with your help I feel confident to pull it apart to do the install.

thanks
Dan