Valentine V1 Install in <10 Steps


jaxgt

GT Owner
Mark IV Lifetime
Jul 12, 2006
2,795
See post #19 in this thread for the shop I, and some other folks, bought the cord from. One end plugs in the detector, and 2 wires plug in the power in the back of the mirror.

Along this thread, are photos where to plug the wires in. Cost about $20 - takes about 20 seconds.
http://www.motorsportimage.com/
 

RADGT

GT Owner
Mark IV Lifetime
Le Mans 2010 Supporter
Aug 31, 2006
858
Connecticut
do you just jam the wires into their repective slots on the back of the mirror as shown in pictures? no soldering, taping, etc?

Stu
 
Aug 25, 2006
4,436
do you just jam the wires into their repective slots on the back of the mirror as shown in pictures? no soldering, taping, etc?

Stu

Stu

The cord that several use looks as below however I integrate a cord into the OEM hardness sheathed as OEM so it does not pull lose and also so that it appears as if OEM.

Mechanically both systems offer the same results

Takes care

Shadowman
 

Attachments

  • DSC06906.JPG
    DSC06906.JPG
    34.2 KB · Views: 188
Last edited:

jaxgt

GT Owner
Mark IV Lifetime
Jul 12, 2006
2,795
Shadowman,
I would be more interested in your setup, as mine does occasionally pull out. Is it something one can do on their own without great Shadowskills?
 

Juan Cooldude

GT Owner
Jul 1, 2008
102
Shadowman,
Which ports in the mirror connector do you plug the yellow and black spades into?

When I plug the cord yellow into the mirror green/12v, and the cord black into the mirror solid black/constant ground - the V1 is constantly on and never turns off. So I end up having to turn the V1 manually on/off.

When I plug the cord yellow into the mirror green/12v, and the cord black into the mirror black/blue (auto ground) - the V1 turns on with when the dome lights come on...but then turns off when the dome light turns off (ie while I'm driving).
 

SYCO GT

GT Owner
Mark II Lifetime
Sep 9, 2006
4,975
California
When I plug the cord yellow into the mirror green/12v, and the cord black into the mirror solid black/constant ground - the V1 is constantly on and never turns off. So I end up having to turn the V1 manually on/off.

I believe I have mine wired similarly, however it seems to eventually power off.

Mine has also fallen out on rare occasion, so I need to make it a more semi-permanent install, then the simple push in.

Looking forward to additional tips from Shadowman, as per posts #104 - #105 also.
 

Fubar

Totally ****** Up
Mark II Lifetime
Le Mans 2010 Supporter
Aug 2, 2006
3,979
Dallas, TX
I installed my V1 in the headliner and used the remote unit behind the rear view mirror (I had to use a special one-way mirror glass). So now I have the advantages of a V1 and it is totally stealth.

One down side is that I lost rear laser detection. Oh well.
 

BlackICE

GT Owner
Nov 2, 2005
1,416
SF Bay Area in California
Laser detection is pretty useless anyway. Any photos of how it mounts in the headliner?
 

HeritageBruce

GT Owner
Mark II Lifetime
Mar 13, 2006
748
Southern CA
I have the V1 hardwired in three of my cars and what I did in all 3 cars was to tap the power from the wiper fuse. I know it is not a very professional install but I just strip the hot wire a little longer and wrap the bare wire around one of the legs of the wiper fuse and since this fuse usually is around 30A, it has plenty of juice to power the V1 and since ignition contorls the wiper, it alos powers on/off the V1. My GT has a K40 so I have no exprience wiring in it but the theory should be the same. Hope this helps. But the V1 Remote display is definitely helps make the install more stealth.
 

Fubar

Totally ****** Up
Mark II Lifetime
Le Mans 2010 Supporter
Aug 2, 2006
3,979
Dallas, TX
Laser detection is pretty useless anyway. Any photos of how it mounts in the headliner?


A buddy of mine makes the mirrors for BMWs and a few other brands. Once he has all the kinks worked out of the Ford mirror, I will ask permission to reference his install procedure for our car. I will start a new thread with lots of pictures at that time... should be 2 or 3 days out.
 

Juan Cooldude

GT Owner
Jul 1, 2008
102
I believe I have mine wired similarly, however it seems to eventually power off.


I stand corrected. My V1 does indeed power off...but after a long time...seems like about 20 mins. I guess I was expecting it to power off when the lights go off.
 

SYCO GT

GT Owner
Mark II Lifetime
Sep 9, 2006
4,975
California
I stand corrected. My V1 does indeed power off...but after a long time...seems like about 20 mins. I guess I was expecting it to power off when the lights go off.

It only works if you are not staring at it. :biggrin

BTW, as far as stealthy, I think the V1 is typically difficult to see for a roadside interviewer, unless they lean down near the cockpit.

Of course, the stealthier, the better, in most cases.
 

Yukonranger

GT Owner
Jun 9, 2008
118
Sagle, ID
A better way of wiring the detector to the mirror is to replace the contacts on the mirror connector and crimp two wires into the contacts (the original wire and one for the detector. The contacts are made by Japan Solderless Terminals and are available from newark.com under part #67C4744. They are $0.113 each so buy some extras and wire up all your cars (and some for screw ups)

The cleanest way to do this it to:

1) Buy a modular telephone cord ($2.00), cut it and strip off the outer insulation about 1" then strip the green (ground) and red (power) wires about 1/4" and solder some 22ga wire to them. then cover the solder joints with shrink tubing then another layer of shrink tubing over the outer cover and the solder joints. Now you have for about $1 what vendors are selling for $10+ and more importantly it is whatever length you want and you don't have a bunch of extra wire raising the cg of your car.

2) remove the plug from the mirror, depress the catch on the outer two terminals and slide them out. Clip off the terminals and strip about 1/8" of insulation off. Strip about 1/8" of insulation off the wires you spliced to your telephone cord.

3) Now insert a new contact into your crimper, insert both wires into the contact and crimp. Insert the crimped contact back into the connector.

Note that you NEED the proper crimper with the proper die set or you will have problems. Any avionics shop will have the proper crimper or if you come to Sandpoint, ID, I will do it for you. You will only be shortening your GT wires about 1/8" and now you have really attached your detector wires to the mirror wires.

This is all clear to me because I just did it, hopefully it makes sense reading it.
 

MAD IN NC

Proud Owner/ BOD blah bla
Mark IV Lifetime
Feb 14, 2006
4,211
North Carolina
yep see post #35 in this thread...... done that!
 

Yukonranger

GT Owner
Jun 9, 2008
118
Sagle, ID
I'm not talking about stuffing pins into the connector alongside the contact where they can just fall out.
 

SYCO GT

GT Owner
Mark II Lifetime
Sep 9, 2006
4,975
California
The quick connect for the Valentine works great in my GT. I bought it from Motorsport Image 916-784-2323 www.motorsportimage.com

I'm selling my Motorsport Image connector, paid $22 for it. I will ship it anywhere in US.

Asking $10, shipping included.

As pictured. I don't need it anymore, went completely hardwired. This was a great solution for the past year or so. Works fine. I'll include my "wiring diagram" Basically if you can plug in a phone, and then plug in two wires to your rear view mirror, you can put this in, in about 3 minutes or less.

IMG_8762.jpg
 

jaxgt

GT Owner
Mark IV Lifetime
Jul 12, 2006
2,795
I have one and really enjoy it. If you use a Valentine detector, you really want one. Good luck.
 

PILOTJPW1

GT Owner
Mark IV Lifetime
Sep 22, 2005
908
Maryland
Hey I will take it.

sent pm.
 

SYCO GT

GT Owner
Mark II Lifetime
Sep 9, 2006
4,975
California
Hey I will take it.

sent pm.

Sold to you. :wink
 

2112

Blue/white 06'
Mark II Lifetime
Hi all,

I seriously considered one of the hidden radar detector installs with, perhaps, the principle advantage being the stealth display and, secondly, active laser "jamming". However, I really didn't find a good place to locate a hidden display and I have to admit that I just really like the Valentine units - already having one in each of the other cars. Also, I believe that if I mounted the V1 near the headliner it would be really hard for anyone outside of the car to see it.

So, the decision was made for the V1. Here's a step by step if you'd like to do the same.

1. Locate and remove the metal plate at the passenger footwell that covers the factory fuse box. There are four fasteners. No tools are required. Flip the D-rings through each fastener "up" and then turn the fastener 90 deg counter-clockwise, and remove. Gently fold the plastic insulation down and steer clear of the black tacky stuff used to install it.

2. Pull the Radio fuse. Note: If you have the Mac option, the fuse is in a different location. (Let me know if you need to know which one.)

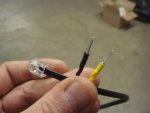
3. Carefully solder an 18-20 gauge wire to one of the legs of the fuse. You may have to file the resulting solder to make sure you retain the full length of the leg.

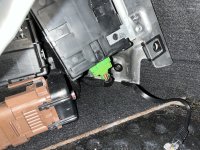
4. Locate the Torx screw located above the nearest copper pipe. The Torx screw is a T-25 size and is on a black metal 90 degree plate holding the copper tube as it passes through the front firewall. This will be your grounding point. You might see a few other screws but none of them provided a proper ground in my testing.

5. Attach the wires for your radio detector to this ground and "switched-hot" locations. Note: In the pictutres below I use small pigtail wires and then butt connectors to connect the V1 power-box. You can improve on my design by soldering the V1 power-wire (red) directly to the fuse and connecting the groud wire to the T-25 screw mentioned previously.

6. Mount the V1 power-box using the supplied velcro pieces. (Pic shows viable mounting location that does not interfere with metal plate.)

7. To route the wire up to the rear view mirror area, no trim pieces need to be removed. Just work slowly and carefully and you'll do just fine.

8. Using a philip screwdriver, remove the passenger's flip-down sun visor. This will give you some room to pull the headliner down ~1/4" to sneak the wire along. Do this all the way over to where you want the V1 mounted at. Pull on the A-pillar end to get the length just right.

9. Fold the plastic shield back into place and re-install the metal plate. Fasteners are inserted, turned 90 degrees and then D-rings are folded over.

10. You're done. The V1 will go on and off with the key - just like the radio.

Here's some pics:

Here's the fuse with the wire soldered on and slightly filed so it will push right back into place. Note the wire insulation is slightle deformed from the pliars. No harm.

Fuse.JPG


Here's the fuse back into place. Note the black wire trailing up by the copper pipe. This is on its way up to the T-25 Torx bolt. Also note the mounting of the V1 power box.

FuseBox.JPG


Finally, here's a couple of pics of where the V1 unit is mounted (using standard V1 suction cups).

Install2.JPG


Install1.JPG


Hope this helps somebody to save a little time.

I couldn’t find the Torx bolt above the copper pipes but if it is on the firewall, no way I could get to it anyway.

Is the mounting bolt behind/below the bright green connector a suitable ground?
 

Attachments

  • IMG_2951.jpeg
    IMG_2951.jpeg
    3.8 MB · Views: 14