
Forum Members,
One of the surest methods to solve the transaxle venting problem is to install the Ford Racing Performance Products (FRPP) transaxle cooler for the GT. However at $1,300 it was a little too much for what I was willing to pay to solve this problem. Therefore I set out to rig up my own cooler, which I dubbed the Poor Man’s Transaxle Cooler, or PMTC.
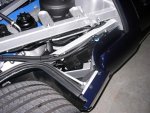
Photos of the installed PMTC can be seen in my album in the gallery (you can search the gallery using Keyword PMTC). Also see Torrie McPhail’s (tmcphail) gallery for a similar and quite elegant cooler install.
First, the disclaimers:
1. My objectives in constructing and assembling the Poor Man’s Transaxle Cooler (PMTC) were to solve the transaxle venting issue and lower my transaxle fluid temperature. The Ford racing transcooler would have accomplished both objectives but I was looking for a more cost effective alternative.
2. The PMTC is NOT an equivalent for the FRPP transaxle cooler, primarily because the PMTC, although very efficient, does not appear as large as the Ford racing transaxle cooler (although it may indeed have as much cooling capacity as the FRPP cooler). Nevertheless, the PMTC DOES noticeably reduce the temperature of the transaxle fluid and did solve my transaxle venting issue.
3. Installing the PMTC does not mean you can “track” your car as if you had a Ford racing transcooler. Although if you already track your stock GT (i.e., no transcooler installed), installing the PMTC will reduce your transaxle fluid temperature at the track.
4. I have only 200 Miles on the transcooler so far, so it remains to be seen if the PMTC is the long-term solution to the venting issue. As for longevity, I predict the PMTC will last as long as or longer than anything else on the car since the PMTC is composed of automotive grade performance parts. An added benefit is it should extend the life of your transaxle as well.
PMTC Parts:
All of the parts for the PMTC are readily available from Summit Racing Products, an online company www.summitracing.com with three retail locations in the US. Those of us in the Atlanta area are lucky to have one of the retail outlets nearby in McDonough, GA., not far from the Atlanta Motor Speedway. I was able to shop online via the Summit Racing website and then go and pick up the parts the same day. The Summit retail outlet is HUGE, 250,000 square feet of nothing but racing and performance parts although much of the building is a warehouse where they fulfill orders for the entire USA. Those with a retail outlet near you owe it to yourselves to check it out.
The heart of the PMTC is the B&M Racing SuperCooler http://www.bmracing.com/index.php?id=products&sid=4&cat=20&subcat=28&pid=282. I chose part number 70273 (although you could use the smaller 70265 which I tried briefly). The cooler is compact (a stacked plate design), is rated at 15,000 BTU cooling capacity and is painted a non-descript black. The cooler has 1/2” NPT inlets and outlets so you will need some adapters to connect it to the hose of your choice.
I chose 3/8” transmission oil cooler hose (readily available at any auto parts store). For a dressier look, you could go with steel braided hose. I used ½” NPT to –6AN male fittings and –6AN 90 degree female to hose barb connectors to connect to my hose.
On the transaxle, I used M16 X 1.5 to –6AN male adapters and to this I connected –6AN female to hose barb fittings, which in turn connect to the hose. I used push on hose barb fittings because the transaxle is not under high pressure and they are easy to work with, requiring no tools to connect them to the hose.
As an alternative you can use –8AN fittings and larger diameter hose. Doing this will allow you to use the existing fittings on the transaxle. You will of course need to use –8AN to ½” NPT connectors at the cooler and –8AN to hose barbs for the hose.
I ended up using about 6 or 7 feet of hose. Your total length may vary depending on how you intend to route your hose.
Total parts cost for the PMTC is about $130 (the ford racing cooler sells for $1,279).
Installation Notes:
The hardest part(s) of the install was rigging up mounting brackets for the cooler and accessing the inlet/outlet on the transaxle.
For the mounting bracket, I doubled up two strips (for strength) of zinc plated steel mounting strap and secured them to the cooler. This effectively lengthened the mounting bracket of the cooler so it could “reach” the two pre-drilled holes in the lower rear sub-frame support on the passenger side (see photos). This also allowed me to mount the cooler without drilling any holes into the frame. I am currently designing a custom billet mounting adapter to make the installation look even more “factory” and professional.
Once the cooler was mounted (with fittings attached), I poured a little transaxle fluid (Mobil 1 full synthetic 75W90) into it to make up for the increased volume of the closed system that would be added by the cooler and hose. (EDIT: I ended up topping off the transaxle with Motorocraft 75W90 transaxle fluid for peace of mind). I did NOT top off the cooler, primarily because I think Ford over-filled the transaxles of many GTs (including mine) and some of the venting is because of this over fill.
Accessing and removing the braided bypass hose and the inlet/outlet fittings on the transaxle case just takes patience and determination. Of course you’ll have to remove the air box, and if you’re intrepid, disconnecting the shifter cables will help as well.
TIP: If you remove the rearmost fitting first, you can get to the other one with no problem. I believe the rearmost fitting is the fluid OUTLET from the transaxle.
Once you have everything cobbled up, you should DRIVE the car (not too far from home at first) to get the transaxle fluid up to temperature and then check for leaks.
EDIT: Venting may occur during the first several miles as the system purges itself of air trapped/added to system by the cooler and hose.
Performance:
Well, I can tell the transaxle cooler is working because it gets HOT! Being bolted on the lower sub-frame rail locates the PMTC in the direct path of “cool” induction air from the side scoop, which is desirable. Although intuitively I believe the PMTC increases the warm up time of the transaxle fluid, I did not perceive an increase in the 2nd gear “notchiness”. In fact, it feels as if my transmission shifts BETTER (this could be due to the fresh fluid I added).
As stated before, there have been no venting issues since the installation of the PMTC. I have driven the car aggressively and gotten the engine temperature up to 205-210 degrees and the transaxle case exterior has been dry as a bone. I’ll report back later if venting incidents occur.
Regards,
Eric
One of the surest methods to solve the transaxle venting problem is to install the Ford Racing Performance Products (FRPP) transaxle cooler for the GT. However at $1,300 it was a little too much for what I was willing to pay to solve this problem. Therefore I set out to rig up my own cooler, which I dubbed the Poor Man’s Transaxle Cooler, or PMTC.
Photos of the installed PMTC can be seen in my album in the gallery (you can search the gallery using Keyword PMTC). Also see Torrie McPhail’s (tmcphail) gallery for a similar and quite elegant cooler install.
First, the disclaimers:
1. My objectives in constructing and assembling the Poor Man’s Transaxle Cooler (PMTC) were to solve the transaxle venting issue and lower my transaxle fluid temperature. The Ford racing transcooler would have accomplished both objectives but I was looking for a more cost effective alternative.
2. The PMTC is NOT an equivalent for the FRPP transaxle cooler, primarily because the PMTC, although very efficient, does not appear as large as the Ford racing transaxle cooler (although it may indeed have as much cooling capacity as the FRPP cooler). Nevertheless, the PMTC DOES noticeably reduce the temperature of the transaxle fluid and did solve my transaxle venting issue.
3. Installing the PMTC does not mean you can “track” your car as if you had a Ford racing transcooler. Although if you already track your stock GT (i.e., no transcooler installed), installing the PMTC will reduce your transaxle fluid temperature at the track.
4. I have only 200 Miles on the transcooler so far, so it remains to be seen if the PMTC is the long-term solution to the venting issue. As for longevity, I predict the PMTC will last as long as or longer than anything else on the car since the PMTC is composed of automotive grade performance parts. An added benefit is it should extend the life of your transaxle as well.
PMTC Parts:
All of the parts for the PMTC are readily available from Summit Racing Products, an online company www.summitracing.com with three retail locations in the US. Those of us in the Atlanta area are lucky to have one of the retail outlets nearby in McDonough, GA., not far from the Atlanta Motor Speedway. I was able to shop online via the Summit Racing website and then go and pick up the parts the same day. The Summit retail outlet is HUGE, 250,000 square feet of nothing but racing and performance parts although much of the building is a warehouse where they fulfill orders for the entire USA. Those with a retail outlet near you owe it to yourselves to check it out.
The heart of the PMTC is the B&M Racing SuperCooler http://www.bmracing.com/index.php?id=products&sid=4&cat=20&subcat=28&pid=282. I chose part number 70273 (although you could use the smaller 70265 which I tried briefly). The cooler is compact (a stacked plate design), is rated at 15,000 BTU cooling capacity and is painted a non-descript black. The cooler has 1/2” NPT inlets and outlets so you will need some adapters to connect it to the hose of your choice.
I chose 3/8” transmission oil cooler hose (readily available at any auto parts store). For a dressier look, you could go with steel braided hose. I used ½” NPT to –6AN male fittings and –6AN 90 degree female to hose barb connectors to connect to my hose.
On the transaxle, I used M16 X 1.5 to –6AN male adapters and to this I connected –6AN female to hose barb fittings, which in turn connect to the hose. I used push on hose barb fittings because the transaxle is not under high pressure and they are easy to work with, requiring no tools to connect them to the hose.
As an alternative you can use –8AN fittings and larger diameter hose. Doing this will allow you to use the existing fittings on the transaxle. You will of course need to use –8AN to ½” NPT connectors at the cooler and –8AN to hose barbs for the hose.
I ended up using about 6 or 7 feet of hose. Your total length may vary depending on how you intend to route your hose.
Total parts cost for the PMTC is about $130 (the ford racing cooler sells for $1,279).
Installation Notes:
The hardest part(s) of the install was rigging up mounting brackets for the cooler and accessing the inlet/outlet on the transaxle.
For the mounting bracket, I doubled up two strips (for strength) of zinc plated steel mounting strap and secured them to the cooler. This effectively lengthened the mounting bracket of the cooler so it could “reach” the two pre-drilled holes in the lower rear sub-frame support on the passenger side (see photos). This also allowed me to mount the cooler without drilling any holes into the frame. I am currently designing a custom billet mounting adapter to make the installation look even more “factory” and professional.
Once the cooler was mounted (with fittings attached), I poured a little transaxle fluid (Mobil 1 full synthetic 75W90) into it to make up for the increased volume of the closed system that would be added by the cooler and hose. (EDIT: I ended up topping off the transaxle with Motorocraft 75W90 transaxle fluid for peace of mind). I did NOT top off the cooler, primarily because I think Ford over-filled the transaxles of many GTs (including mine) and some of the venting is because of this over fill.
Accessing and removing the braided bypass hose and the inlet/outlet fittings on the transaxle case just takes patience and determination. Of course you’ll have to remove the air box, and if you’re intrepid, disconnecting the shifter cables will help as well.
TIP: If you remove the rearmost fitting first, you can get to the other one with no problem. I believe the rearmost fitting is the fluid OUTLET from the transaxle.
Once you have everything cobbled up, you should DRIVE the car (not too far from home at first) to get the transaxle fluid up to temperature and then check for leaks.
EDIT: Venting may occur during the first several miles as the system purges itself of air trapped/added to system by the cooler and hose.
Performance:
Well, I can tell the transaxle cooler is working because it gets HOT! Being bolted on the lower sub-frame rail locates the PMTC in the direct path of “cool” induction air from the side scoop, which is desirable. Although intuitively I believe the PMTC increases the warm up time of the transaxle fluid, I did not perceive an increase in the 2nd gear “notchiness”. In fact, it feels as if my transmission shifts BETTER (this could be due to the fresh fluid I added).
As stated before, there have been no venting issues since the installation of the PMTC. I have driven the car aggressively and gotten the engine temperature up to 205-210 degrees and the transaxle case exterior has been dry as a bone. I’ll report back later if venting incidents occur.
Regards,
Eric
Attachments
Last edited:
