Diy bumper delete


Mooney56

GT Owner
Jan 21, 2012
98
Houston, Texas
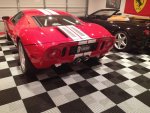
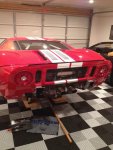
I tackled the CDC Bumper Delete today and it took about 3 hours to the point where I am at. I am definitely more than halfway because all I have to do is rehang the rear fascia and stick the clamshell back.

For those of you that want to try it yourself I would say it was a pretty easy project. I still need to get the filler panel painted which I will do this week. Then I will post a few pics of the install.

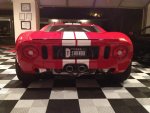
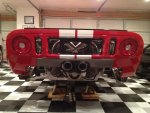
I chose the Gt Guys Exhaust which looks great. It may be a little too loud for me but I will wait until the car is out of the garage before I make a decision. The quality of the part is outstanding.

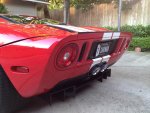
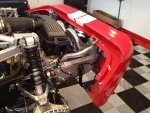
I had no problem getting the bolts out of the frame but I did remove the bolt from the transaxle cross member which gave me plenty of room. Also my car is a low mile car so all of the exhaust bolts, and frame extension bolts, were easy to loosen.

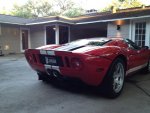
I did find that although the instructions did not call for it that it was a lot easier to remove the rear fascia for the project.
 

Attachments

  • IMG_0976.jpg
    IMG_0976.jpg
    152.1 KB · Views: 544
  • IMG_0974.jpg
    IMG_0974.jpg
    175.1 KB · Views: 509
  • IMG_0963.jpg
    IMG_0963.jpg
    126.2 KB · Views: 509
  • IMG_0977.jpg
    IMG_0977.jpg
    147.2 KB · Views: 503
Last edited:

2112

Blue/white 06'
Mark II Lifetime
One of the best mods you can do. :thumbsup
 

Ed Sims

GT Owner
Mark IV Lifetime
Apr 7, 2006
7,853
NorCal
GTs were always meant to not have a rear bumper.

Ed
 

Mooney56

GT Owner
Jan 21, 2012
98
Houston, Texas
Getting Closer

The light is there at the end of the tunnel. As soon as the lower mesh panel arrives this week it will be completed. The rags are there because the lower panel aligns the bottom edge. For those of you that want to try this yourself it really wasn't bad. The guys at CDC were great to deal with. All in it took me about 5 hours to do the job.
 

Attachments

  • IMG_0989.jpg
    IMG_0989.jpg
    188 KB · Views: 374
  • IMG_0988.jpg
    IMG_0988.jpg
    151.3 KB · Views: 375

Steve Schneider

GT Owner
Dec 16, 2010
131
Hello Mooney56

Curios how easy was it to line up the clam shell when you re installed it, did the body panels keep consistent gap, did you mark hinges before removal?

Steve
 

Mooney56

GT Owner
Jan 21, 2012
98
Houston, Texas
It was really no problem at all. I didn't mark anything because I didn't like where the panels were sitting previously. Frankly, the gaps are better now that I have readjusted everything. The biggest challenge to the job was getting the exhaust adjusted to hit the hole in the rear panel in the right spot.
 

2112

Blue/white 06'
Mark II Lifetime
Huge Improvement! Looks great. :thumbsup
 

MNJason

GT Owner
May 14, 2010
2,096
San Diego
Do you have to remove the clamshell? I guess to fit the shorter exhaust the answer is yes.
 

Mooney56

GT Owner
Jan 21, 2012
98
Houston, Texas
Do you have to remove the clamshell? I guess to fit the shorter exhaust the answer is yes.
You really need to remove the clamshell because the best practice is to also remove the rear fascia. Also, I could not get two the two screws that secure the heat shields to the frame rails without removing the muffler. Although I read someone removed a muffler with the clamshell on it would be a true PITA and you would be more likely to damage something. Remember, to remove the clamshell its only two people, two pins and two beers to get it off so why not.
 

MTV8

GT Owner
Mark II Lifetime
Jul 24, 2010
1,018
Houston Texas
Although I read someone removed a muffler with the clamshell on it would be a true PITA and you would be more likely to damage something.

I found the rear fascia to create the tight spot when removing the muffler as opposed to the clamshell.

Nice project and very impressive to do in 5 hours. I think it took me 5 hours to change the oil.
 

Mooney56

GT Owner
Jan 21, 2012
98
Houston, Texas
I found the rear fascia to create the tight spot when removing the muffler as opposed to the clamshell.

Nice project and very impressive to do in 5 hours. I think it took me 5 hours to change the oil.
If they would have made access through the belly pan for the oil change it really would have been nice.
 

Mooney56

GT Owner
Jan 21, 2012
98
Houston, Texas
It is all Done

The project is finished. If any of you want to try this yourself feel free to PM me and I will be happy to guide you through. It was really a pretty easy project. Reon at CDC was great to deal with and had no problem shipping me the kit in two separate shipments since he did not have the entire kit in stock when I ordered it.
 

Attachments

  • IMG_0998.jpg
    IMG_0998.jpg
    125.2 KB · Views: 130
  • IMG_0997.jpg
    IMG_0997.jpg
    139.4 KB · Views: 133
  • IMG_0999.jpg
    IMG_0999.jpg
    146.9 KB · Views: 132
  • IMG_1001.jpg
    IMG_1001.jpg
    190.6 KB · Views: 136

shelbyelite

PERMANENTLY BANNED
May 10, 2007
1
Looks great! Beautiful Job. Nice wheels you got there also....
 

Mooney56

GT Owner
Jan 21, 2012
98
Houston, Texas
Thanks for the compliment (and thanks for the wheels).
 

Beach-GT

GT Owner
Mark II Lifetime
May 8, 2006
887
Seminole Florida
I really like the look but if you ever get hit in the butt.......