Being in AZ, I never needed heat…until this December. I flipped it on only to find that I had no heat. All other HVAC functions worked well, including the AC. I researched various pieces of information. Turns out it is a stuck blend door, way up inside the heater core.
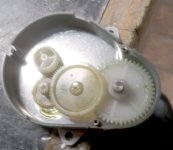
This door is @ a 4” x 8” rigid alum door that is activated via servo by commands from the large temp control knob on the center console. The door is ringed in a foam tape that seals the door against its seat. In my case, the foam separated from the adhesive backing, exposing the adhesive to the seating enclosure. It basically glued itself shut! Unfortunately, just freeing it is not enough. The servo becomes slightly damaged from trying to release the stuck door, thereby stripping a couple of the teeth from the servo gears. When the servo tries to engage it cannot because the missing teeth prevent the gears from engaging. By placing some lead weight on the door you effectively rotate the door ever so little so that clean, nonstripped gear teeth mesh, and the door operates freely once again.
But how to get to all of this??? The shop manual says to replace the whole heater core blower unit. It could not be in a worse location in the car. Very inaccessible. The whole dash must be removed to do the replacement. Fortunately, Team Jeff did this identical repair and gave me the inspiration to do the job.
It goes without saying…lots of blue tape on exposed sensitive surfaces!!!
Here is the step by step process:
OK, now time to repair the blend door. In the bottom of the dash, where the heater duct was that you removed, there is a rectangular opening. There are a total of three doors that are visible. You can see them by laying upside down and poking your head up under the driver foot well. Two of those doors must be actuated and pivoted such that you can see the actual blend door that opens to the heater core. Patience here…turn the ign key to on. Rotate the fan knob and upper/lower duct diverter knob until those two doors pivot allowing you to view the blend door. Thar she blows…
With finesse you can reach up and gently rotate the blend door by hand. This door is nearly horizontal to the floor. It is difficult to get your hand on it. I heard a small pop indicating that the blend door was no longer stuck to its seat. I had hoped that by freeing it all would be well. Not so. See my description about the stripped gear in the opening dialog. With the ign key still on, now rotate the temp control to hot while guiding the blend door gently by hand. You will find that it operates perfectly. Its only at its fully heat closed position (console control on max cold rotation) that the missing gear teeth prevent it from opening. By adding weights to the lower part of the door, you create a gravity assist to engage the servo gear to a viable tooth.
Instead of repeating how to add weights to the heater blend door, its best to see team Jeff’s explanation and video below. I used four ounces of evenly distributed weight.
http://www.fordgtforum.com/forums/s...-what-could-be-the-issue&highlight=blend+door
http://player.vimeo.com/video/32026828
Last step was to lightly apply silicone grease to the exposed blend door foam adhesive that was mentioned earlier. Because you cannot remove the door to remove the intruding adhesive, I simply greased it so it will no longer stick the door shut. This part was nearly impossible. Patience again, A small bead of grease on one finger, then a well guided hand maneuverer will bring you to the exposed foam adhesive.
After the weights are added, verify the repair is working by turning on the fan and slowly rotating the temp control to heat. If the door operates freely, the repairs are successful. I brought the car up to temp and tried all the HVAC functions before reassembly. I also would advise not to rotate the temp control to max heat. By doing so, you are causing the blend door to seat firmly into foam surround seat which could hasten removal of the foam from its adhesive. It also adds some stress to the servo by mechanically forcing it to a stop. I found that a 4oclock’ position on the heat temp knob securely seats the door in heat mode but does not crush it into the foam surround.
Follow instructions in reverse order for reassembly. Thanks again Team Jeff for your guidance.
Good luck. Feel free to PM with any questions.
Tom
This door is @ a 4” x 8” rigid alum door that is activated via servo by commands from the large temp control knob on the center console. The door is ringed in a foam tape that seals the door against its seat. In my case, the foam separated from the adhesive backing, exposing the adhesive to the seating enclosure. It basically glued itself shut! Unfortunately, just freeing it is not enough. The servo becomes slightly damaged from trying to release the stuck door, thereby stripping a couple of the teeth from the servo gears. When the servo tries to engage it cannot because the missing teeth prevent the gears from engaging. By placing some lead weight on the door you effectively rotate the door ever so little so that clean, nonstripped gear teeth mesh, and the door operates freely once again.
But how to get to all of this??? The shop manual says to replace the whole heater core blower unit. It could not be in a worse location in the car. Very inaccessible. The whole dash must be removed to do the replacement. Fortunately, Team Jeff did this identical repair and gave me the inspiration to do the job.
It goes without saying…lots of blue tape on exposed sensitive surfaces!!!
Here is the step by step process:
- Remove rear speaker and trim, center console R&L floor trim pieces, hand brake bezel, and shifter knob.
- Unbolt center console 8 bolts. Raise up several inches from rear, reach under and disconnect HVAC control harness. Lift off center console.

- Remove the three dash climate trim rings. A sharp pull and they are out. Label them in order for replacement.
- Remove lower leather dash trim. There are 16 pressure clips. See photo. These clips release by pulling with constant pressure. It is straight forward to remove. No tricks. Be careful as this piece is very fragile and can crease in the middle. It is one long piece. This step requires two people to prevent creasing. Set aside in safe place.

- Next step is optional. Remove the MAC stereo head. Use the factory tool to remove right and left trim strips, then the right and left keys to gently pull the stereo to reveal connectors on the back. I was puzzled that I found one primary connector on the rear, the antenna and a hard wired power connection. The power connection did not remove and appeared to terminate somewhere behind the dash that I could not reach. (see step 8) So I opted to remove the entire stereo and surrounding center bezel as one unit which allowed me to find the main stereo wiring harness connector that could be disconnected. This allowed the unit as an assembly to be easily lifted out.
- Remove the right and left lower dash metal knee trim plates. 4 (give or take) sheet metal screws per side and a couple of pressure clips.
- Remove center stereo trim bezel attaching screws. 4 per side in foot well, 3 large upper dash bolts and a single top centered sheet metal screw. There is also a right and left heater duct plastic set pin that is attached to the center stereo trim unit. Remove each from L&R side.

- Gingerly pull radio and trim assem forward to expose rear cable harnesses and connections. Reach in with one hand and unplug starter button, accessory socket, air bag warning and stereo connectors. Obviously, the Mac radio can now be pulled free from the center trim unit if you would like. Otherwise take the trim and the radio out as an assem. Set entire unit aside.

- Remove small floor mounted rear radio hold down bracket. Two bolts. Easy stuff.
- Remove HVAC floor duct splitter. This is one piece. Remove by pulling forward. It takes some manipulation to clear some obstructions, but it will come out.

- Remove the HVAC controller from the center console and reattach to the mating console floor electrical connector, just behind the shifter, so that you are able to give the system commands.
OK, now time to repair the blend door. In the bottom of the dash, where the heater duct was that you removed, there is a rectangular opening. There are a total of three doors that are visible. You can see them by laying upside down and poking your head up under the driver foot well. Two of those doors must be actuated and pivoted such that you can see the actual blend door that opens to the heater core. Patience here…turn the ign key to on. Rotate the fan knob and upper/lower duct diverter knob until those two doors pivot allowing you to view the blend door. Thar she blows…
With finesse you can reach up and gently rotate the blend door by hand. This door is nearly horizontal to the floor. It is difficult to get your hand on it. I heard a small pop indicating that the blend door was no longer stuck to its seat. I had hoped that by freeing it all would be well. Not so. See my description about the stripped gear in the opening dialog. With the ign key still on, now rotate the temp control to hot while guiding the blend door gently by hand. You will find that it operates perfectly. Its only at its fully heat closed position (console control on max cold rotation) that the missing gear teeth prevent it from opening. By adding weights to the lower part of the door, you create a gravity assist to engage the servo gear to a viable tooth.
Instead of repeating how to add weights to the heater blend door, its best to see team Jeff’s explanation and video below. I used four ounces of evenly distributed weight.
http://www.fordgtforum.com/forums/s...-what-could-be-the-issue&highlight=blend+door
http://player.vimeo.com/video/32026828
Last step was to lightly apply silicone grease to the exposed blend door foam adhesive that was mentioned earlier. Because you cannot remove the door to remove the intruding adhesive, I simply greased it so it will no longer stick the door shut. This part was nearly impossible. Patience again, A small bead of grease on one finger, then a well guided hand maneuverer will bring you to the exposed foam adhesive.
After the weights are added, verify the repair is working by turning on the fan and slowly rotating the temp control to heat. If the door operates freely, the repairs are successful. I brought the car up to temp and tried all the HVAC functions before reassembly. I also would advise not to rotate the temp control to max heat. By doing so, you are causing the blend door to seat firmly into foam surround seat which could hasten removal of the foam from its adhesive. It also adds some stress to the servo by mechanically forcing it to a stop. I found that a 4oclock’ position on the heat temp knob securely seats the door in heat mode but does not crush it into the foam surround.
Follow instructions in reverse order for reassembly. Thanks again Team Jeff for your guidance.
Good luck. Feel free to PM with any questions.
Tom
Last edited:

 ... sorry to hear about the stuck flap. I worry about that happening to mine some day